Table of Contents

So... You type www.amazon.com into your web browser and hit enter.
What happens?
More specifically, what is the browser doing behind the scenes to load this page and why should you even care about this process? If the code works, why bother learning why it works?
In this post, I'm going to convince you why you, as a web developer need to understand this process.
Prerequisites
In general this post is best suited for someone who...
- Has built web apps before
- Has a solid grasp of JavaScript (or another language)
- Has full-stack experience and understands the concept of "client vs. server"
- Has a bit of devops experience (not required, but helpful)
If you're missing any of those, it's okay. Keep reading. Ideally, you should read this post every couple years until you feel confident in your understanding of it. It took me years to grasp all of this, and I still have gaps.
In addition to the above "soft" prerequisites, here are some additional ones that you'll want to skim through before diving in to the meat of this post.
Prerequisite 1: What are core web vitals?
There are tons of metrics we can look at when evaluating the performance of a webpage, but in general, here are the big 3, referred to as "Core web vitals" that are often cited as the most important factors for improving a site's technical SEO:
- Largest Contentful Paint (LCP) - the time it takes to load the largest resource (usually an image). Sites should aim for < 2.5 seconds for this.
- First input delay (FID) - how long it takes for the webpage to respond to a user click (or other action). Sites should aim for < 100ms here.
- Cumulative layout shift (CLS) - how much the page shifts during load. For example, text on a page shifting down when an image loads, creating a "jolt" like effect that is unpleasant to the user. Sites should aim for a factor < 0.1 here.
In the context of this post, we're mainly focused on LCP and FID, which have a few supplementary metrics that are useful for addressing different types of performance issues.
- Loading experience
- Time to first byte (TTFB) - a page loads in a series of data packets. This measures how long it takes to load the first byte of data from the time the page is initially loaded.
- First contentful paint (FCP) - the time it takes to render any piece of content to the page (could be text, image, etc.)
- Interactivity experience
- Time to interactive (TTI) - the time it takes to load all the main content of the webpage to the point where the page is responsive to user actions (clicks, etc.)
- Total blocking time (TBT) - a simple equation,
TTI - FCP, which represents the span of time where the user couldn't interact with the page because they were "blocked" by loading JavaScript
I will be sprinkling these acronyms throughout this post, so be sure to reference this section when you need it!
For a more in-depth overview of these, I recommend checking out Google's Web Vitals page.
Prerequisite 2: What are the various rendering types?
My goal with this post is to explain the process the browser goes through to load a webpage. Unfortunately, I cannot explain that without mentioning the different rendering strategies we have available. To make matters more complicated, when you bring a modern web framework into the picture, they will often construct their own intermediate representation of the DOM (e.g. React's VDOM) and even combine rendering strategies to get the "best of both worlds" (e.g. Next.js), which makes our discussion a bit more involved. I will do my best to explain the "Vanilla" versions of everything while also highlighting how modern libraries/frameworks sneak their way into the overall process.
Because of this, I'm NOT going to be explaining these rendering strategies in-depth, and we will keep each of them isolated in our examples (i.e. we won't talk about SSR + Re-hydration).
Nevertheless, here are the main types of rendering you'll see on the web today.
Server side rendering (SSR)
Dynamic data is fetched server-side at request time and inserted into an HTML document, which is then sent in its entirety to the browser. Prominent examples of this would include Laravel (PHP), Ruby on Rails (Ruby), Flask (Python), and Express + EJS/Pug (JavaScript). This strategy produces a very fast TTI metric, but might result in a slower TTFB metric. In other words, it might take the page a few seconds to load, but once it does, it's super quick and interactive.
Static site generation (SSG)
Data is fetched at build time (i.e. when you deploy your app, NOT when a user views it) and delivers a set of static HTML pages for the server to respond with on different routes. Examples of this include frameworks like Gatsby, Next.js export, and Jekyll. More recently, you might have heard a term called "JAMStack", which is commonly associated with this approach. This strategy is the most performant of all strategies, yet the least flexible since all the page routes and data required to generate the site is needed at build time.
Server-side rendering with re-hydration
A relatively new approach that attempts to achieve the "best of both worlds". Next.js is the most prominent example of this, but is also implemented in Gatsby, Remix, and a few others. This is a complex approach that aims to achieve a fast TTI (benefit of CSR) while also achieving a fast TTFB (benefit of SSR).
Client-side rendering (CSR)
This is commonly known as a "Single Page APP", or "SPA" and is a pattern where the browser receives an empty HTML document with a "container" div and a JS bundle. With just this information, the browser runs all the JavaScript and constructs the entire HTML document, routes, and other interactivity client-side. Common examples of this include Angular and Create React App. This strategy produces a very fast TTFB, but if the app is bloated with JavaScript, could result in a very slow TTI metric. In other words, the user might see something immediately, but won't be able to interact with it for a couple of seconds. Generally, this is not great for public-facing websites where SEO is a major concern. It can be good for dashboard-like apps that aren't indexed by search engines.
Prerequisite 3: Webpage vs. Website
This is mainly a terminology thing, but very important. A webpage represents a single HTML file (often called index.html) that loads HTML, CSS, and JavaScript.
A website is a collection of webpages that live on a server. Usually, a website lives on a single server, but it is possible to host a portion of webpages of a website on distributed servers.
These are not "official" terms (you'll find varying definitions on the web), but these are what I will use in this post.
Connecting the dots: when we talk about CSR above (single page apps), that just means that an entire website is derived from a single page where JavaScript is in control of the routing function of the website. Because of this, some would argue that my definition of a "website" is off because you can have hundreds of "pages" served from a single index.html document in an SPA. Nevertheless, I think it's most clear to associate "webpage" with index.html and "website" with multiple index.html files.
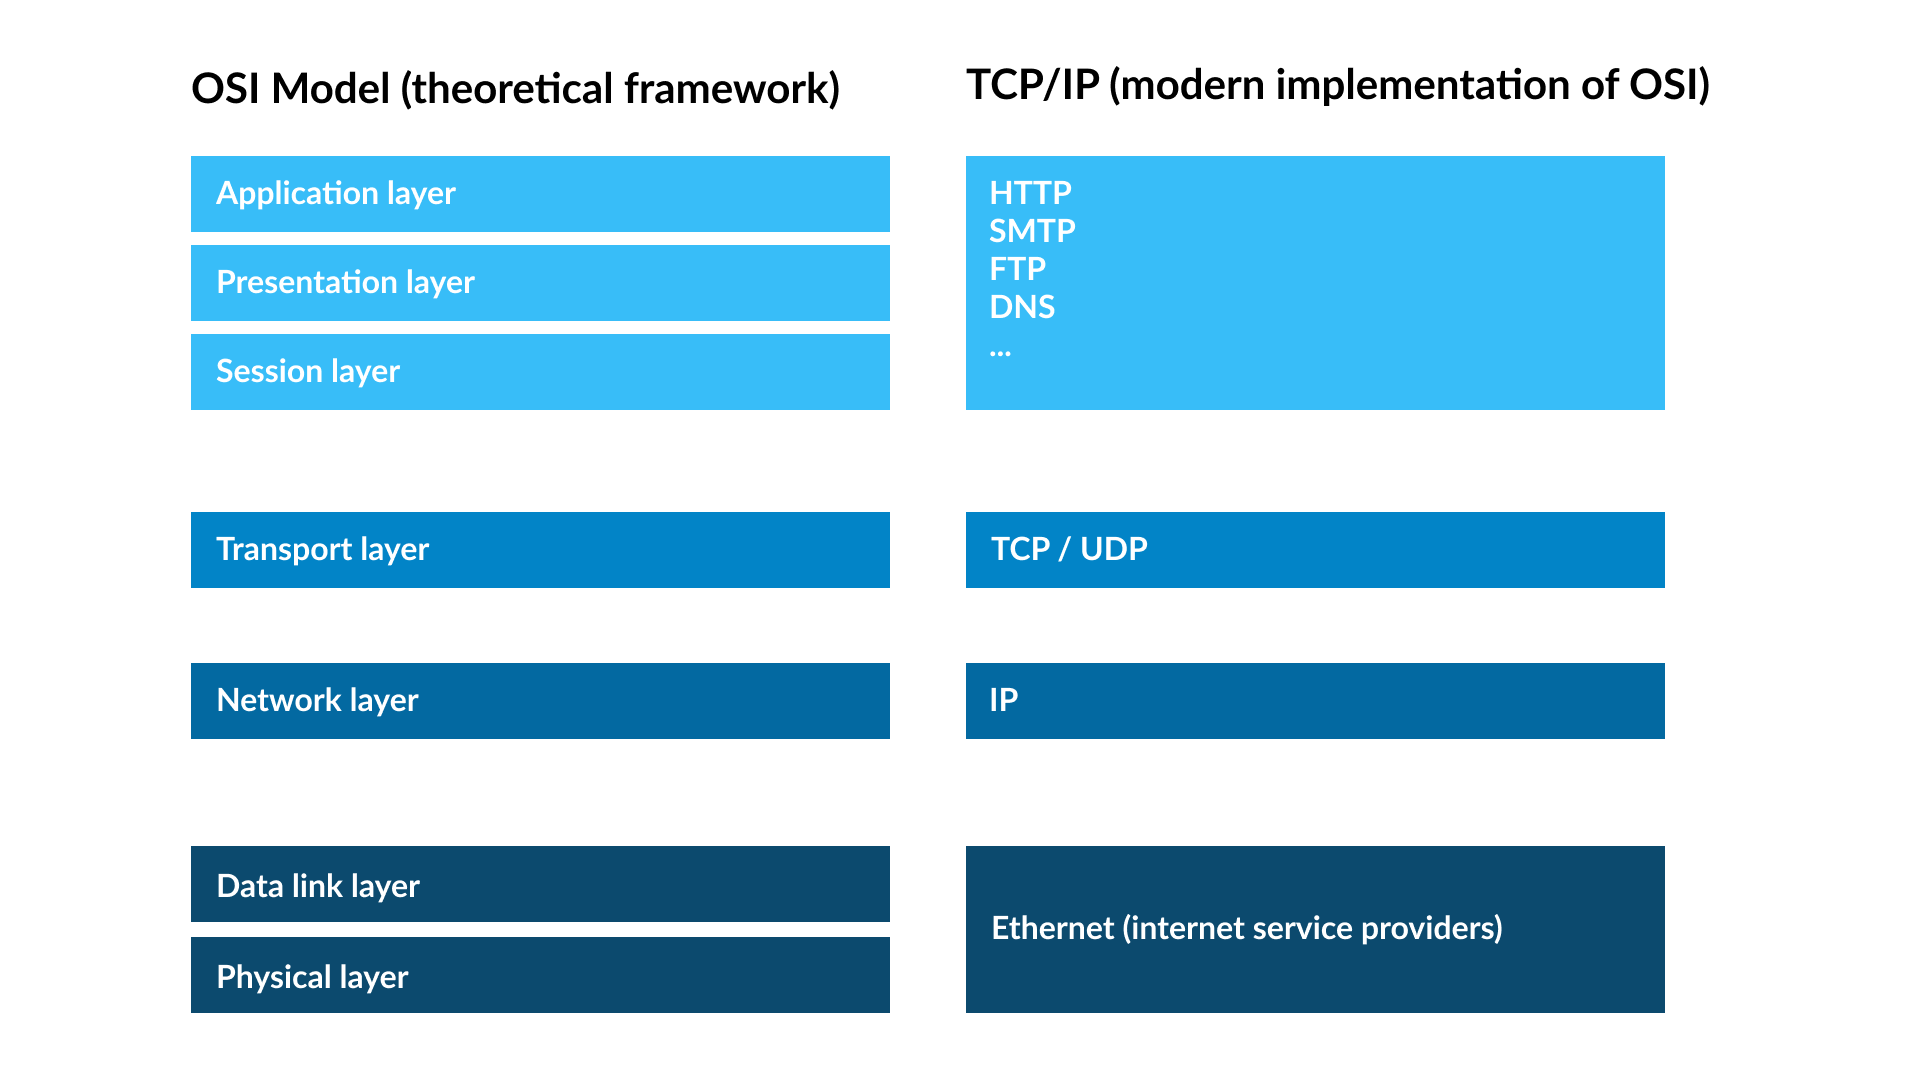
Prerequisite 4: OSI Model vs. TCP/IP
Tired of these prerequisites? Well, you picked the wrong profession and the wrong blog to read. The internet is a complex onion with many layers, and to understand one layer, you at least need to be aware of the layers beneath. That's what we're doing here.
The OSI Model is a theoretical spec (similar to how we define ECMAScript as the "spec" behind the JavaScript programming language). The Internet Protocol Suite, otherwise known as "TCP/IP" represents an implementation of the OSI model (it actually came before OSI), and is the functional implementation that the "internet" runs on today. None of this makes sense without an example, so here's an image that does better than any words I could write explaining it.
To explain this, imagine you are sending a POST request from your application in a Google Chrome browser to a remote server in a different geographic location. This POST request will go from layers 1 => 7 in the request and then from layers 7 => 1 in the response.
- Layer 1 - Application - this layer is where Google Chrome runs, receives mouse clicks from a user, and subsequently fires off an HTTP
POSTrequest, which then goes through layer 2. Think "user interaction". - Layer 2 - Presentation - this layer takes the payload of your
POSTrequest, compresses it, encrypts it, and sends it off. On the way back from the remote server, it will decrypt the response and format it in a way the application layer understands (let's say, JSON format). Transport layer security (TLS) runs here. - Layer 3 - Session - this layer controls the connection, or "session" between 2 physical devices in a network. Our simple
POSTrequest doesn't necessitate a persistent session (it is "half-duplex", or unidirectional communication), but you might want a websocket connection ("full-duplex", or bi-directional communication), which is a persistent connection, handled at this layer. - Layer 4 - Transport - this layer uses either the Transport Layer Protocol (TCP) or the User Datagram Protocol (UDP) to move data from one place to another. Think of this as the "post office for the web" where letters and packages are not opened; only transmitted to their destination based on the address assigned.
- Layer 5 - Network - this layer takes the package sent from the "post office" in layer 4 and finds the quickest route to deliver it. In other words, this layer is "navigational system" between two IP addresses, which might include several intermediate IP addresses.
- Layer 6 - Data Link - this layer ensures the delivery of a packet of data between two directly connected (via ethernet or Wifi) "nodes" (each having a MAC address).
- Layer 7 - Physical - this layer is the physical world and defines how data, in the form of 1s and 0s will travel through a physical medium (telephone wires, fiber optic cables, etc.).
Overview: the steps a browser takes to load a webpage
And we're finally here! We're finally ready to learn the steps a browser takes to load a webpage.
There are 5 high-level steps a browser takes between the time a user types an address into the URL bar until the site is fully interactive.
- DNS Resolution
- TCP / TLS Handshakes
- Fetch webpage from server
- Browser parses and renders the HTML response
- Browser handles post-load user interactions with the page
Steps 1-2 will be the same no matter how we are rendering the webpage, while steps 3-5 will slightly differ depending on our rendering strategy (i.e. SSR, SSG, CSR).
Step 1: DNS resolutions
No matter what browser you use, it will be configured to communicate with DNS servers. In this post, I'll be focusing on Google Chrome to keep things tangible, but similar processes occur with Firefox, Edge, Safari, etc.
From our prerequisites, we know that a webpage lives as an HTML document on a server. That server has a unique IP address (see how IP addresses work), which is either a 32 bit (IPV4) or 64 bit (IPV6) number, and given that IP address, we know where the server is located and how to connect to it.
To translate a URL to an IP address, the following process occurs in your browser.
As an example, let's say we are resolving www.amazon.com.
- Browser cache - the browser checks to see if the URL is in its DNS cache (visit chrome://net-internals/#dns to see it in Google Chrome). If found, the IP address is resolved. This is the default for most sites you frequently visit.
- OS cache - if not cached in browser, the next cache that is checked is the Operating System DNS cache. On a Mac, you can run the command
ps -ax | grep mDNSthat will show the two processes responsible for caching DNS resolutions, which as of the latest Mac OS are calledmDNSResponderandmDNSResponderHelper. - DNS Recursive Resolver - if there is no browser or OS cache of the URL, the browser connects to its configured "DNS Resolver", which you can think of as the "middleman" responsible for searching the DNS universe until it finds someone (a server) who knows the IP address of this URL. The DNS resolver first checks its cache. If found, the IP address is immediately returned. If not, proceeds to step 4.
- Root nameservers - the DNS resolver keeps a list of "root nameservers". These root nameservers are essentially an "index" that keeps track of all the TLD nameservers. In our example,
www.amazon.comhas a TLD of.com, so the root nameserver will respond to the DNS resolver with the address of the geographically closest.comTLD nameserver. - TLD nameservers - the DNS resolver now has the location of the
.comTLD nameserver, which it connects to. The TLD nameserver then responds with the authoritative nameserver for the specific domain,www.amazon.com. - Authoritative nameserver - this is the server that keeps the "source of truth" record for
www.amazon.com's IP address (think Google DNS, AWS Route 53, NameSilo, GoDaddy, etc.). Having found the location of this server, the DNS resolver will now make a request towww.amazon.com's authoritative nameserver, which will respond with the IP address for the URL.
With the help of our DNS resolver, the browser now knows the IP address of www.amazon.com and is ready to do some TCP / TLS handshakes for security purposes.
How is the DNS Resolver chosen?
In step 3 above, your device must choose a DNS resolver to use, which is by default, provided by your Internet Service Provider via your home router settings. I won't discuss corporate networks or VPNs as they are much more complicated.
You can also manually set a DNS resolver. For example, you could use Google's public DNS resolver by setting your home network's primary DNS to 8.8.8.8 and secondary DNS to 8.8.4.4. Here is a longer list of available resolvers..
In the end, the resolver chosen can be found in the device DNS settings. For example, on a Macbook Pro or Linux device, you can run cat /etc/resolv.conf, which is the file where the DNS resolver is specified. There is no factory default for this as it is usually derived from the home network's router. For example, I have manually set my home router's DHCP setting to 8.8.8.8 and 8.8.4.4, which is then read by my Macbook Pro and used in /etc/resolv.conf as the default DNS resolver.
Step 2: TCP / TLS Handshakes
Remember from our prerequisites above, the "TCP/IP" model is essentially describing the "Internet Protocol Suite", or an implementation of the OSI Model. After the DNS resolution completes and we have an IP address to the server which hosts the webpage files, it is time for our Google Chrome browser to perform a 3-way TCP handshake with that server.
3-Way TCP Handshake
The purpose of this handshake is for your Google Chrome browser to establish a "short term contract" with Google's server (which has the webpage content for www.amazon.com on it).
This all happens in layers 4 (TCP) and 5 (IP) of the OSI model outlined in the prerequisites, and as such, you cannot inspect this handshake in your browser dev tools. Instead, you must use a utility called tcpdump or a popular OS GUI like Wireshark that visualizes the output of tcpdump.
After the handshake completes, we'll move up to layer 3 where the established "session" is managed.
The basic handshake happens in 3 steps, often referred to as "SYN-ACK".
- SYNchronize - browser (Google Chrome) sends a "synchronize" packet to server (Amazon's server)
- SYNchronize and ACKnowledge - server acknowledges the packet
- ACKnowledge - browser acknowledges that it received the server's acknowledgment
This involves lots of cryptic-looking data formats that we don't need to get into. Just think of this as the "here's how we're going to communicate" stage.
TLS Handshake
Terminology note: Transport layer security, or "TLS" is the new term for Secure Sockets Layer, or SSL. TLS = new, SSL = old, but they are both referring to the same thing.
By default, internet communication is not encrypted. In this step, we go through another multi-step negotiation. The point of this negotation is for the server to prove to the client that they are who they say they are. After the client is convinced of this fact, an HTTPS, or TLS connection is established, which encrypts all data sent between the two physical machines (browser/client and server).
There are lots of technicalities here that are explained well by Cloudflare in What happens in a TLS handshake, so I'll aim to summarize them in an easier-to-understand fashion.
- Client: "Hey server, can you send me your SSL certificate? Here are all the ciphers that I support, so try to match them??"
- Server: "Hey client, here's my SSL certificate. It has my public key and some other information for you."
- Client: "Thanks server, let me reach out to your Certificate authority and verify this public key real quick."
- Client (again): "Alright server, things seem to match, so let's agree on a symmetric key encryption key that we can use to encrypt and decrypt data over our connection"
Through this process, public key cryptography is used, which I have explained in another detailed post called Making Sense of Public Key Cryptography.
Once the TCP handshake and the TLS negotation is complete, we are finally ready to make an HTTP GET request from our Google Chrome browser to the Amazon server to load Amazon's homepage.
Step 3: Fetch webpage from server
At this point, our browser has established a secure connection with Amazon's server and makes an HTTP GET request on our behalf. The very first data that is received has some special considerations to talk about.
- TTFB (time to first byte)
- Slow starts (the "14KB rule")
Time to first byte
The first data received from the server is how TTFB (time to first byte) is measured. TTFB includes all of those prior steps we talked about (DNS resolution, TCP/TLS handshakes), and should occur in ~0.8 seconds or less for your site to fall in the top 75% of sites and be considered "fast".
The "14KB rule"
If you remember from earlier, layer 4 of Internet Protocol describes TCP/UDP, which is the "Post office of the web". At this layer, packets of data are not opened; just transferred to their appropriate address.
In order to get a feel for how fast the network is between your browser and Amazon's server, the TCP/UDP layer first sends a small, 14KB response (about 1,000 words of plaintext) to the GET request. If that is delivered okay, it will then double the response size to 28KB and keep doing this until packets start getting dropped by the server. It's basically a throttling mechanism that takes a conservative approach to start and slowly gets more confident as packets are succesfully ACKnowledged. Here is a great writeup by TuneTheWeb on the 14KB rule that also uses Amazon's website as an example!
This process continues until the client has received the entire HTML document from the server. But even after the first 14KB of data, the browser has been doing something behind the scenes...
Step 4: Browser parses and renders HTML response
While pieces of the HTML document are being delivered from Amazon's server to our browser client, the browser has been attempting to translate this plain text HTML document into the DOM (document object model) and CSSOM (CSS object model).
But who is responsible for parsing the HTML received in the GET request from step 3?
In short, the browser engine, also known as a "rendering engine" is responsible for this task. In Google Chrome, this is the Blink engine, which is a separate concern from the well-known V8 JavaScript Engine.
If you're interested, here is a full history of browser engines, but I'll share the cliffnotes:
- In 2003, Apple announces that they are going to use a browser engine called KHTML from Konquerer (open source)
- In 2005, Apple spins off its own version of KHTML and calls it "Webkit"
- In 2008, Google announces their own browser project, "Chromium". This was a derivative of Apple's Webkit project, except they removed the JavaScriptCore module, replaced it with "V8", and wrapped the entire package (V8 + Webkit) into the "Chromium" browser.
- In 2009, Node.js was released, and since Google had developed a modular V8 engine for JavaScript that could run both inside and outside the browser, this engine was used server-side in Node.
- In 2013, Google announces a new project called "Blink", which was essentially a spin-off of WebKit. Today, Blink is the engine behind most browsers including Brave, Microsoft Edge, Opera, Chrome (of course!), and many others listed here.
So that's how we got here. From Apple's original OS contribution (ironic, since Apple is largely built on a proprietary platform) of WebKit to Google's contributions of V8 and the "new and improved WebKit", Blink, browser engines have slowly started to consolidate. In Chromium browsers, Blink handles the HTML/CSS parsing and rendering while V8 handles all the JavaScript.
What is the Critical Rendering Path? (CRP)
At this point, the browser (we're using Google Chrome as our example) has resolved DNS records, established a secure connection, and made a GET request to the server (amazon.com is our example) to retrieve the HTML document living there. This HTML document is being delivered in a stream of data ("14KB rule"), and for each new piece of data, the Blink rendering engine is walking through the HTML document, constructing the DOM and CSSOM. This entire process is often referred to as the Critical Rendering Path, and has several sub-steps. I will be explaining an overview of each step and therefore will gloss over the "details". If you want to go deep on how your browser rendering engine turns HTML/CSS/JS into visual pixels on the screen, you should start with How Blink Works.
At a high level, your browser's rendering engine performs the following steps:
- Construct DOM + CSSOM (resource fetching)
- Create Render tree (DOM + CSSOM)
- Generate layout
- Paint the content to the browser
A note on processes and threads
For the sake of simplicity, I am going to be abstracting away the details of processes and threads in this discussion. In reality, your browser will run the rendering engine in one process (usually a single browser tab), which primarily works on the "main thread" and spawns worker threads for certain computations. If you are curious, here is an overview of Chrome's multi-process architecture.
To simplify our discussion, just think of the following as individual "programs" that can interact with each other. I will be walking through what each of these do in the following sections.
- HTML Parser
- Preload Scanner
Resource fetching
In the eyes of a frontend developer, this is your highest impact concept to understand, so listen up.
As your browser receives pieces of the HTML document, the HTML Parser and Preload Scanner both start reading it at the same time. They have completely different goals though.
The HTML Parser is reading EVERYTHING in a sequential order. When it sees HTML, it parses it. When it sees a <script> tag, it loads the JavaScript and runs it (and blocks everything else).
The Preload scanner has one very important job, and that is to scan through the HTML and find all the external resources which may include:
- JavaScript via
<script>elements - CSS via
<link>elements - Images via
<img>elements - Video/audio via
video/audioelements
When the scanner sees any of these, it will make a network request to start loading it. The goal is to make all these requests as quickly as possible so when the HTML Parser reaches that part of the document, the resource is already loaded!
Where do the resources come from and why does that matter?
Usually, these resources will come from a CDN or the same server that delivered the original HTML document. If your site is static, it is generally best to deliver these resources via a CDN as it ensures they will be downloaded in the user's browser fast due to caching and proximity. If your site is not static, you will likely have to load some resources from the origin server.
The key point here is that every resource is a network request, which is subject to the latency and bandwidth of the user's network.
If your resources are large and your user's network is slow, your site will take a significant time to parse and cause a poor user experience. This is an especially important consideration for single page applications that load a single JavaScript "bundle". The bundle size is a huge factor in how fast your site performs because it is loaded over a network of varying speeds.
How to prioritize resources
There are two ways to prioritize certain resources:
- Location in the document
- Give the HTML Parser and Preload Scanner some "hints" with HTML attributes
To explain why location in the HTML document matters, consider the following document:
<html>
  <head></head>
  <body>
    <h1>Post title</h1>

    <script src="./some-huge-js-file.js"></script>

    <p>Post content</p>
  </body>
</html>
If this was our HTML document, the HTML parser is going to parse our h1 tag quickly, but before it parses the post content (p tag), it has to fetch and execute the ./some-huge-js-file.js JavaScript! This is a blocking operation that will halt all HTML parsing until the JavaScript finishes execution.
To improve this, you should always place your scripts at the end of your body tag (something you probably knew already but didn't understand why you were doing it):
<html>
  <head></head>
  <body>
    <h1>Post title</h1>
    <p>Post content</p>

    <script src="./some-huge-js-file.js"></script>
  </body>
</html>
In addition to the location, we can also give the parser and scanner some hints.
For example, we could add the rel="preload" link attribute to tell the scanner to immediately download a certain stylesheet.
<link rel="preload" as="style" href="./some-stylesheet.css" />
Usually you don't need this for stylesheets since they get parsed and loaded pretty quickly anyways, but this can be helpful when you have lots of huge resources to load for a page and want to set some explicit prioritization.
You can also give instructions to the HTML parser for your scripts. For example, you could use the async attribute to tell the parser, "Hey parser, execute me as soon as I'm loaded, but do NOT run me if you've still got other HTML to parse. Don't let me block you.".
<!-- "Download me at your convenience, don't let me be a blocker" -->
<script src="./some-huge-js-file.js" async></script>
Alternatively, you could use defer to tell the parser, "Hey parser, do all of your HTML parsing and then come back and run me when all that is done".
<!-- "Come back to me after you're done" -->
<script src="./some-huge-js-file.js" defer></script>
You should use these attributes as often as possible with one caveat. If your script directly changes the DOM via document.write(), it cannot use async/defer since this directly affects how the render tree is constructed by the parser.
Speaking of the render tree...
Render tree / DOM tree
While we talked about resource loading as if it was an isolated step, it is NOT! While the HTML Parser and Preload Scanner are parsing the chunks of HTML document data they receive from the server, the HTML Parser is also constructing the "Render Tree", also known as the "DOM" + "CSSOM". While oversimplified, it looks something like this:
- html
  - head
  - body
    - div
      - ul
        - li
        - li
        - li
    - footer
      - p
Furthermore, CSS styles are associated with the elements. If no explicit style is found for a DOM element, the browser will often provide a default stylesheet that will be attached to the DOM. For example, here is Chrome's default stylesheet.
(this is all pseudocode)

- html
  - head
  - body [color: darkgray; margin: 0;]
    - div
      - ul [list-style: square;]
        - li
        - li
        - li
    - footer [font-weight: 500;]
      - p
I have left out lots of small details about the render tree, but the important things to remember are:
- HTML Parser takes raw HTML, CSS, and JS and constructs the "DOM" / "Render Tree"
- All three (HTML, CSS, JS) can potentially affect the "DOM" / "Render Tree", so they all need to be parsed before anything can paint to the screen
Layout
At this point, the HTML Parser has built the DOM and CSSOM which are a JavaScript representation of HTML and CSS. Before making visual changes to the screen, the rendering engine now must make pixel calculations.
Every physical device has a different screen size and pixel density, so the rendering engine starts with this critical information. You can also tell the browser how to calculate this device size in the head of your document with the viewport meta tag:
<head>
  <meta name="viewport" content="width=device-width, initial-scale=1" />
</head>
This gives the engine its starting point for calculations.
After it has this starting point, the engine will traverse down the Render Tree looking at the structure (html) and style (css) and will make calculations to figure out:
- Relative to the viewport, what pixel coordinates does this element belong at?
- Relative to its location, how large should this element be (width, height)?
This is called the "Layout" phase because the browser rendering engine is figuring out where and how big the elements in the Render Tree are.
Layout phases
- Layout - the initial calculation of layout based on the Render Tree
- Reflow - subsequent layout calculations to a portion of the page
Reflow can be triggered by simple CSS or JavaScript. Have a hover pseudo selector that causes a tooltip to open? Reflow. Have a dropdown menu controlled by JavaScript? Reflow.
This can be a significant cause of performance issues in many cases, but one notable example is CLS, or Cumulative Layout Shift with images. If the initial HTML/CSS does not define a height and width of an image, a reflow will be triggered once the dimensions are found which is both costly and causes visual "jank" as the screen resizes in front of the user's eyes.
While this is one of the shortest sections of this post, the calculation of layout is one of the most challenging parts of displaying a webpage from a rendering engine standpoint.
Paint
The last phase is to actually start "painting" things to the browser screen. The rendering engine will again traverse down the Render tree, but this time, it's looking for information about how to paint the screen. It knows where to put the elements, but now, it needs to know:
- Do I put element X on top of element Y? Or the reverse? (e.g. z-index)
- What color do I make element X? How about a shadow? Font weight?
All of this is contained within the Render Tree.
Bring in the GPU!
In some cases, your computer's GPU will be recruited to help paint the screen. This is relevant for things like the canvas element where painting is complex.
When the GPU is brought in, the layout is split into layers. A layer can be executed on the GPU (rather than CPU) and speed things up. When this happens, the engine uses compositing to know how each layer relates to one another so it can paint layers in the correct order, position, z-index, etc. As an analogy, if you've ever used Photoshop, you know that artwork is "composed" in layers, which can be re-ordered to determine z-index and exist in isolation. The same thing can be done when painting elements to a browser. You can read more about compositing here.
Step 5: Browser handles interactions with the page (post-load)
While you probably thought we'd never actually get our webpage loaded to the screen, we finally made it.
At this point, all the deferred JavaScript will run and things are complete-ish...
The user can now view your webpage and interact with it, but as you could imagine, user interactions will re-trigger a lot of the things we discussed in the prior sections.
Remember, our process is parse => layout => paint. These steps happen sequentially, so if something in a prior step changes, the pipeline must re-run.
Luckily, the browser engine is smart enough that it doesn't start from scratch every time. For example, if the user clicks a button to show a new HTML element, the rendering engine will add that element to the render tree (HTML + CSS), which will cause a reflow of a part of the layout and repaint of part of the UI.
A step by step explanation loading a real webpage
Since most of this post has been theoretical, I have created a basic static webpage to demonstrate how you can visualize this process in your browser.
My webpage is pretty simple. I am hosting it on AWS S3 as a static website with the default URL http://basic-static-site-example.s3-website-us-east-1.amazonaws.com/ (you won't be able to visit this as I've taken it down).
This static site has 3 files. First, we have index.html:
<!DOCTYPE html>
<html lang="en">
  <head>
    <meta charset="UTF-8" />
    <meta http-equiv="X-UA-Compatible" content="IE=edge" />
    <meta name="viewport" content="width=device-width, initial-scale=1.0" />
    <link rel="stylesheet" href="style.css" />
    <title>Sample Static Site</title>
  </head>
  <body>
    <h1>Sample Title</h1>
    <p>Sample content</p>
    <script src="script.js"></script>
  </body>
</html>
Then, a basic script.js that loads:
window.addEventListener("load", () => {
  console.log("document loaded");
});
And a basic style.css that turns everything green:
* {
  color: darkgreen;
  font-size: large;
}
Using the Chrome Dev Tools, we can visualize most of the journey to load this basic webpage. Remember, here are the five steps taken to load a webpage:
- DNS Resolution
- TCP / TLS Handshakes
- Fetch webpage from server
- Browser parses and renders the HTML response
- Browser handles post-load user interactions with the page
We cannot see steps 1-2 in the Chrome dev tools because they happen in layers 4-6 of the OSI model. We can see steps 3-5 though!
Fetch webpage from server
If you refresh this static website and go to the Network tab of dev tools, you'll see 3 requests:
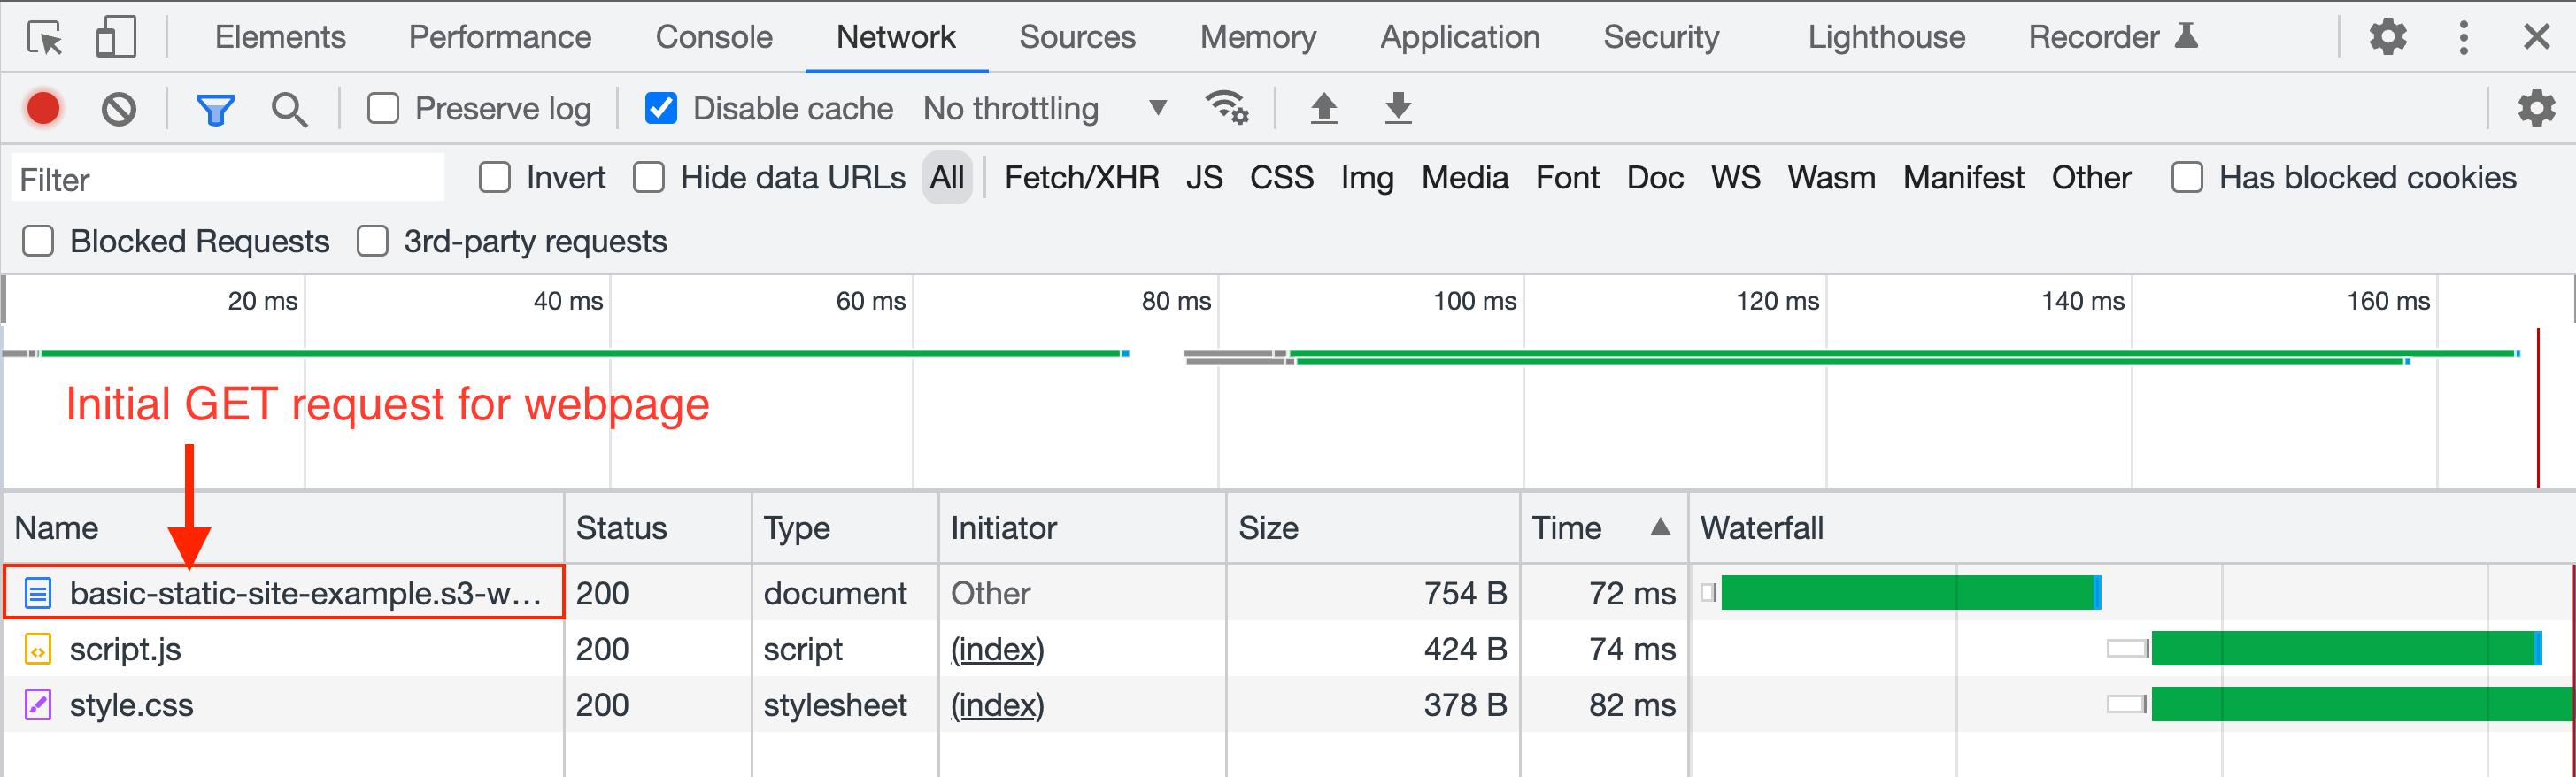
The top request is the initial GET request that the browser sends automatically after the DNS resolution and TCP/TLS handshakes. This request is being sent directly to the AWS server where the static site lives.
The next two requests are made by the preload scanner which scans the HTML document and looks for external resources that it needs to load. You can see that the Initiator is set to index because these two resource requests were initiated as a result of parsing index.html. Both of these resources live in the same place as index.html, so the browser has to make GET requests to the same AWS server where the S3 bucket is hosted. Ideally, all three of these requests would be made to a CDN, but I'm not using one for simplicity here.
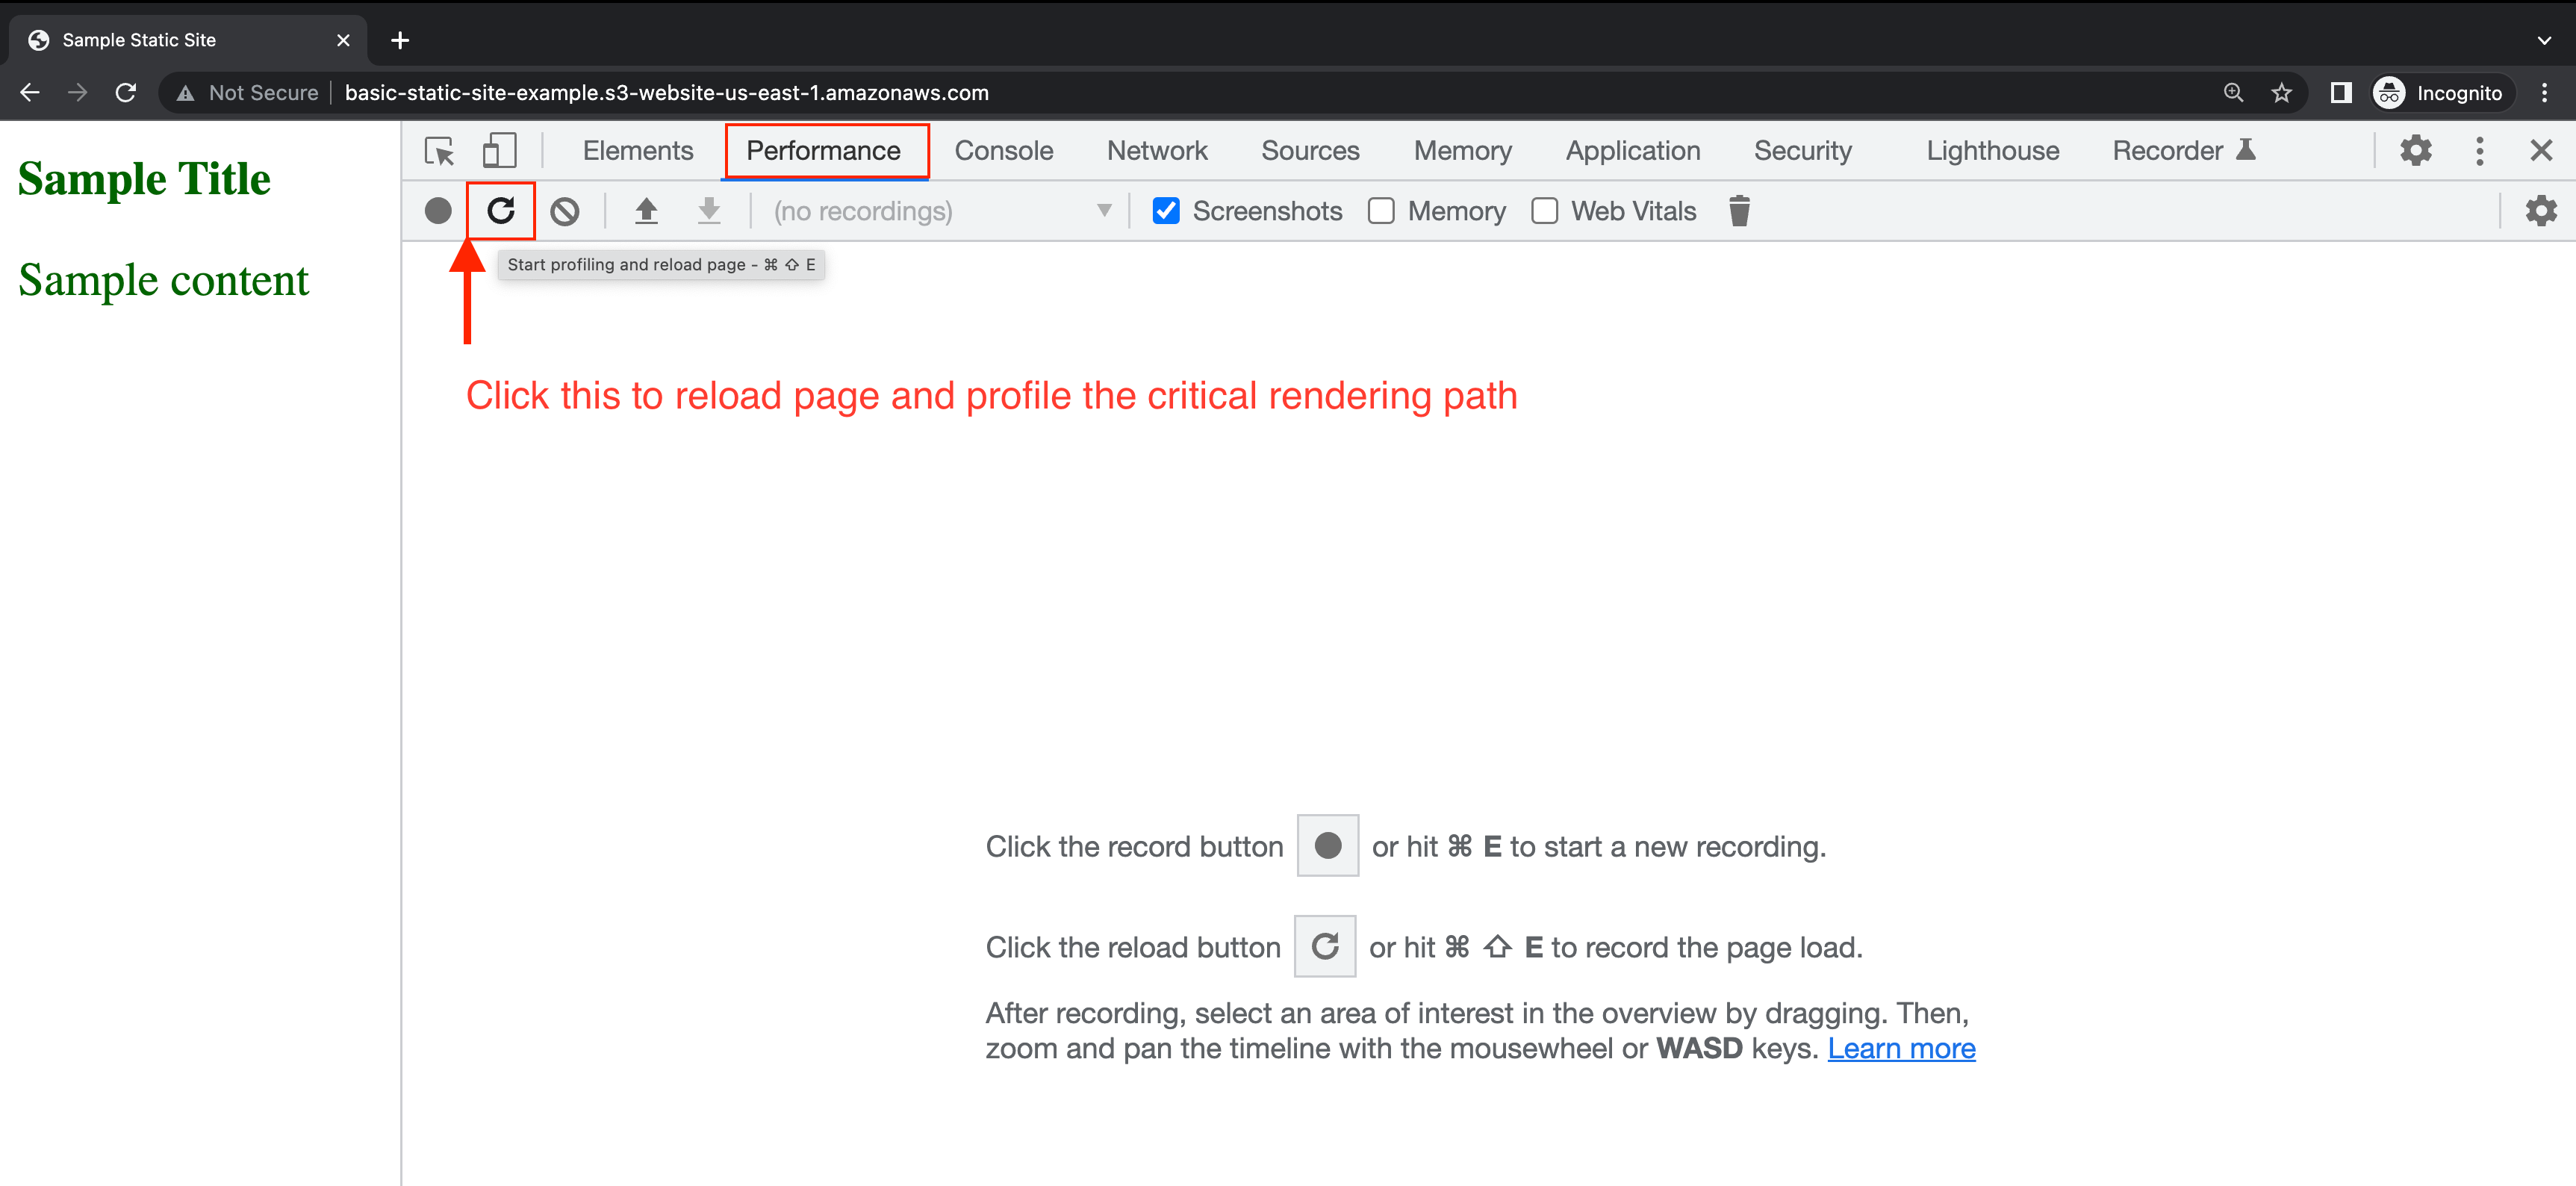
The network tab can only tell us so much. To really see what's going on here, we need to go to the Performance tab and record the initial page load with the dev tools Profiler.
After running this, we can now see those 3 network requests in the context of the overall critical rendering path:
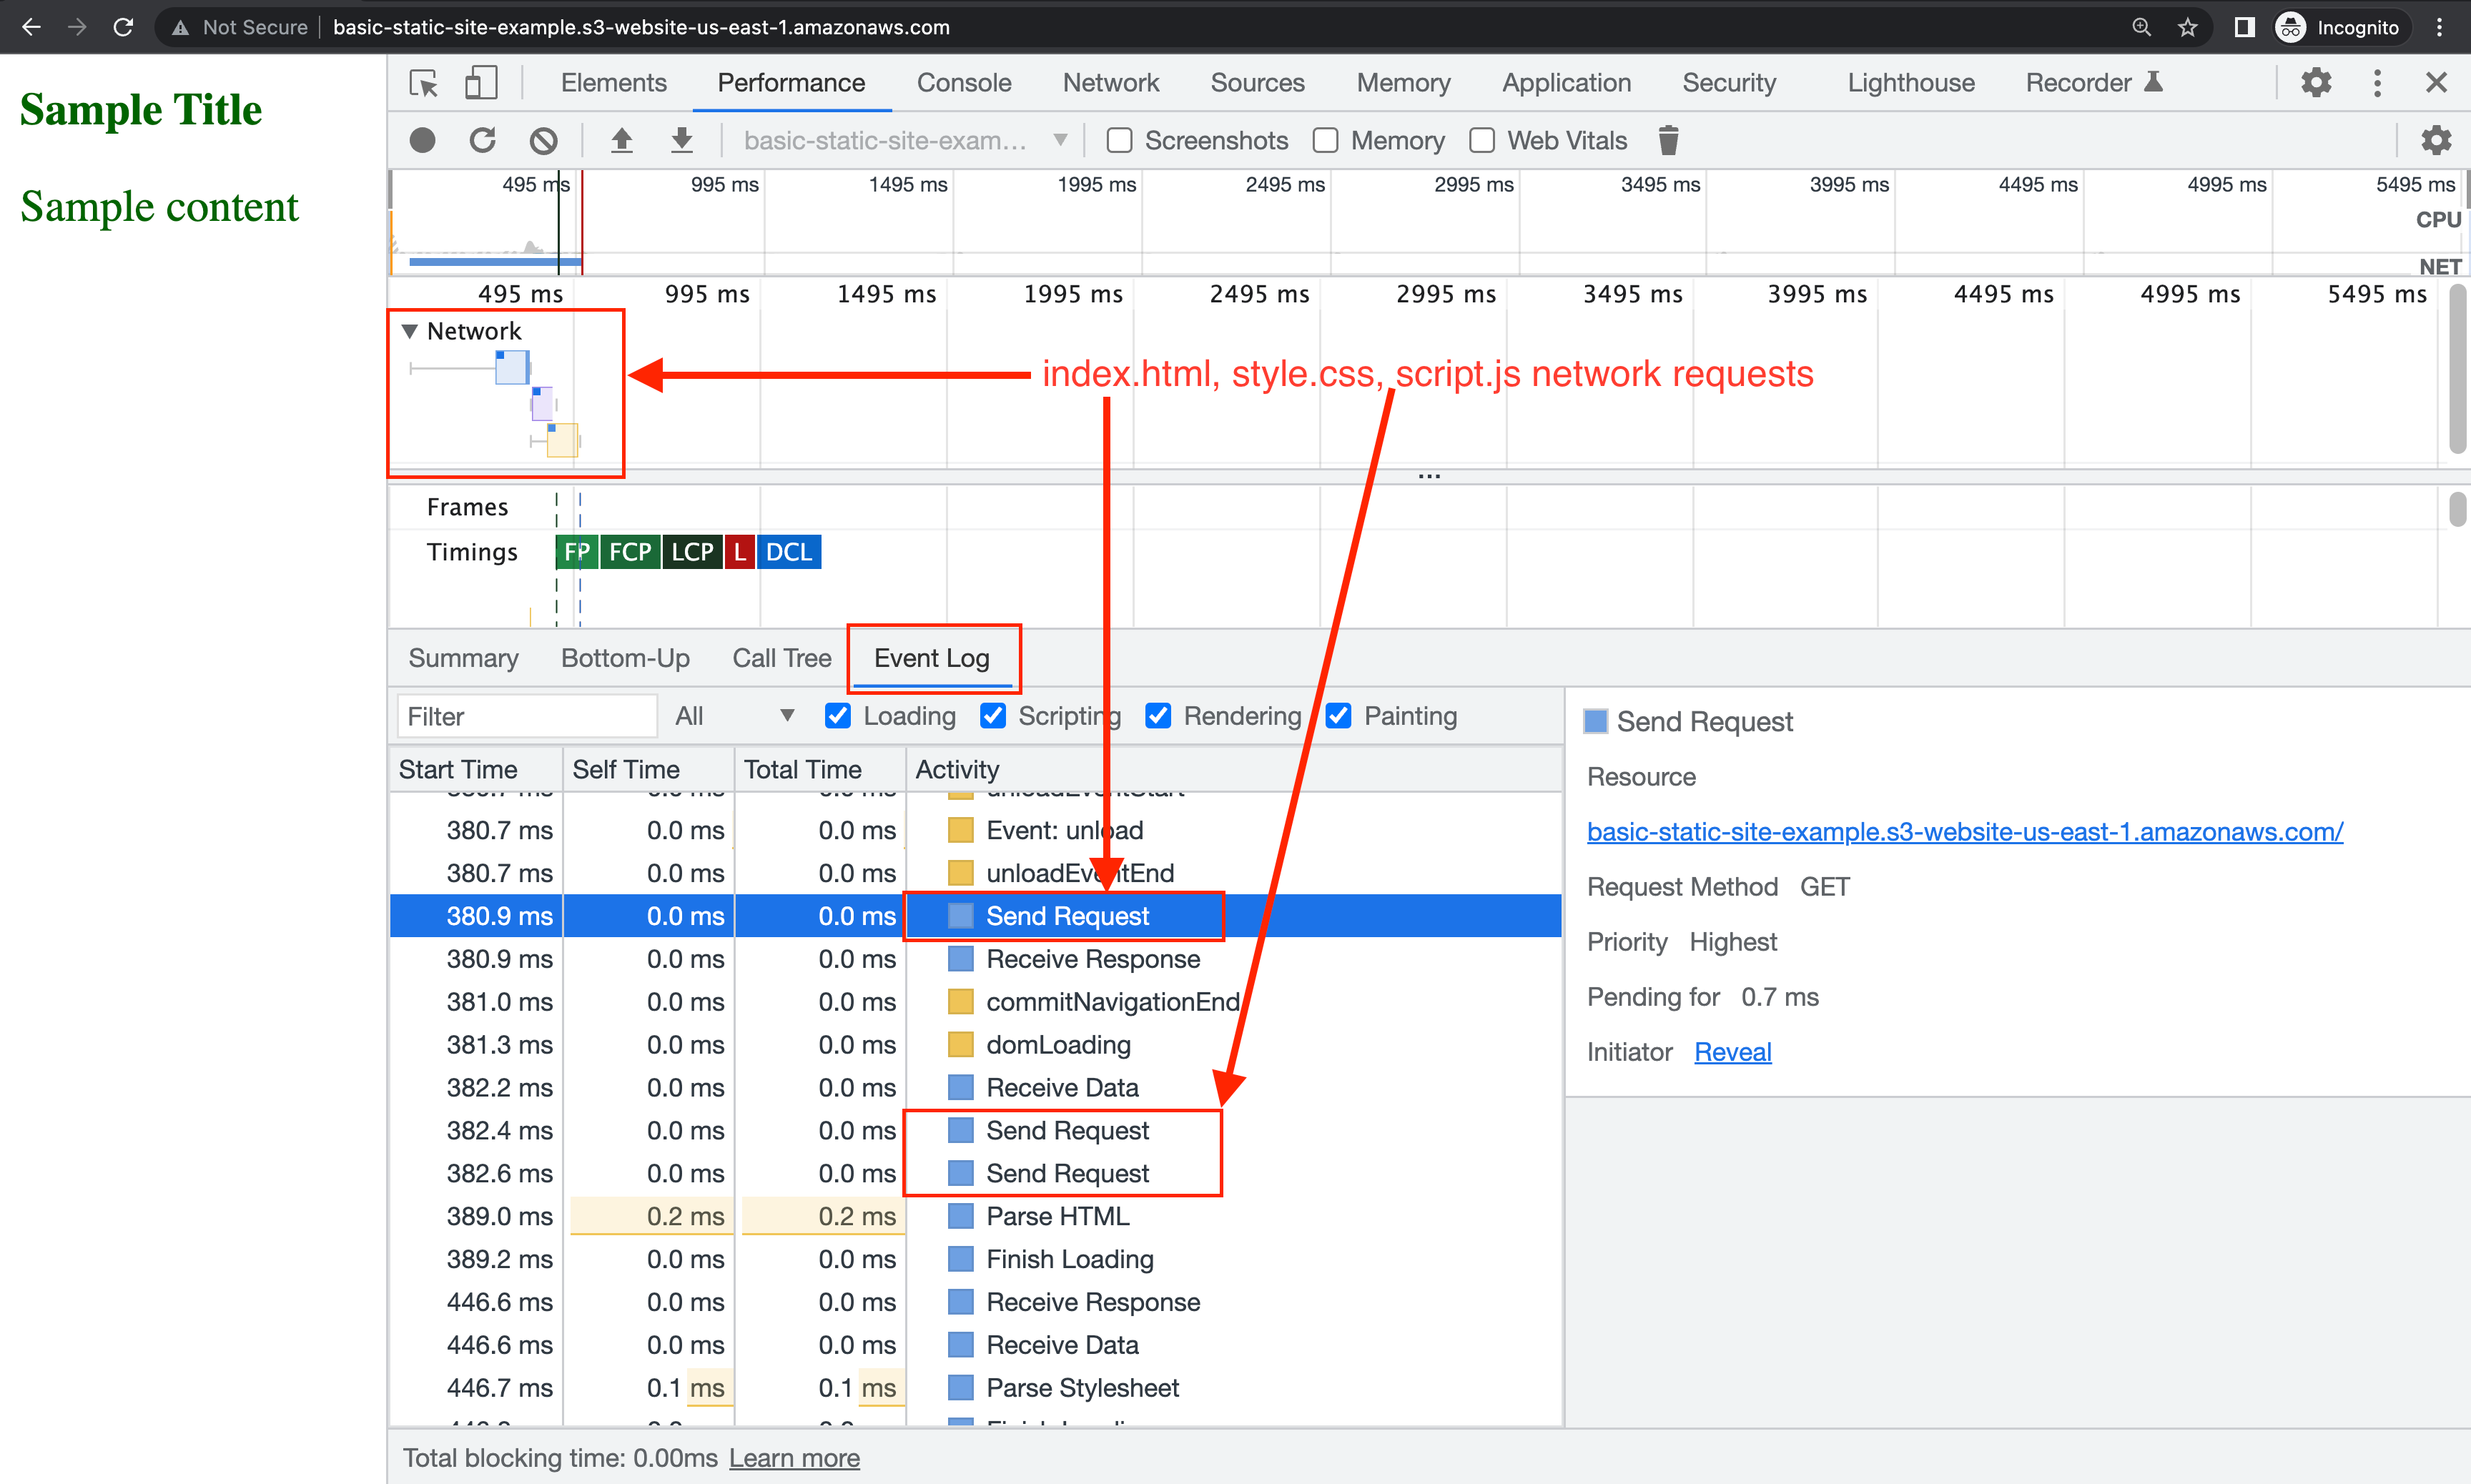
Browser parses and renders HTML
Looking at the same profiler output, we can also identify the parsing/rendering process of the CRP.
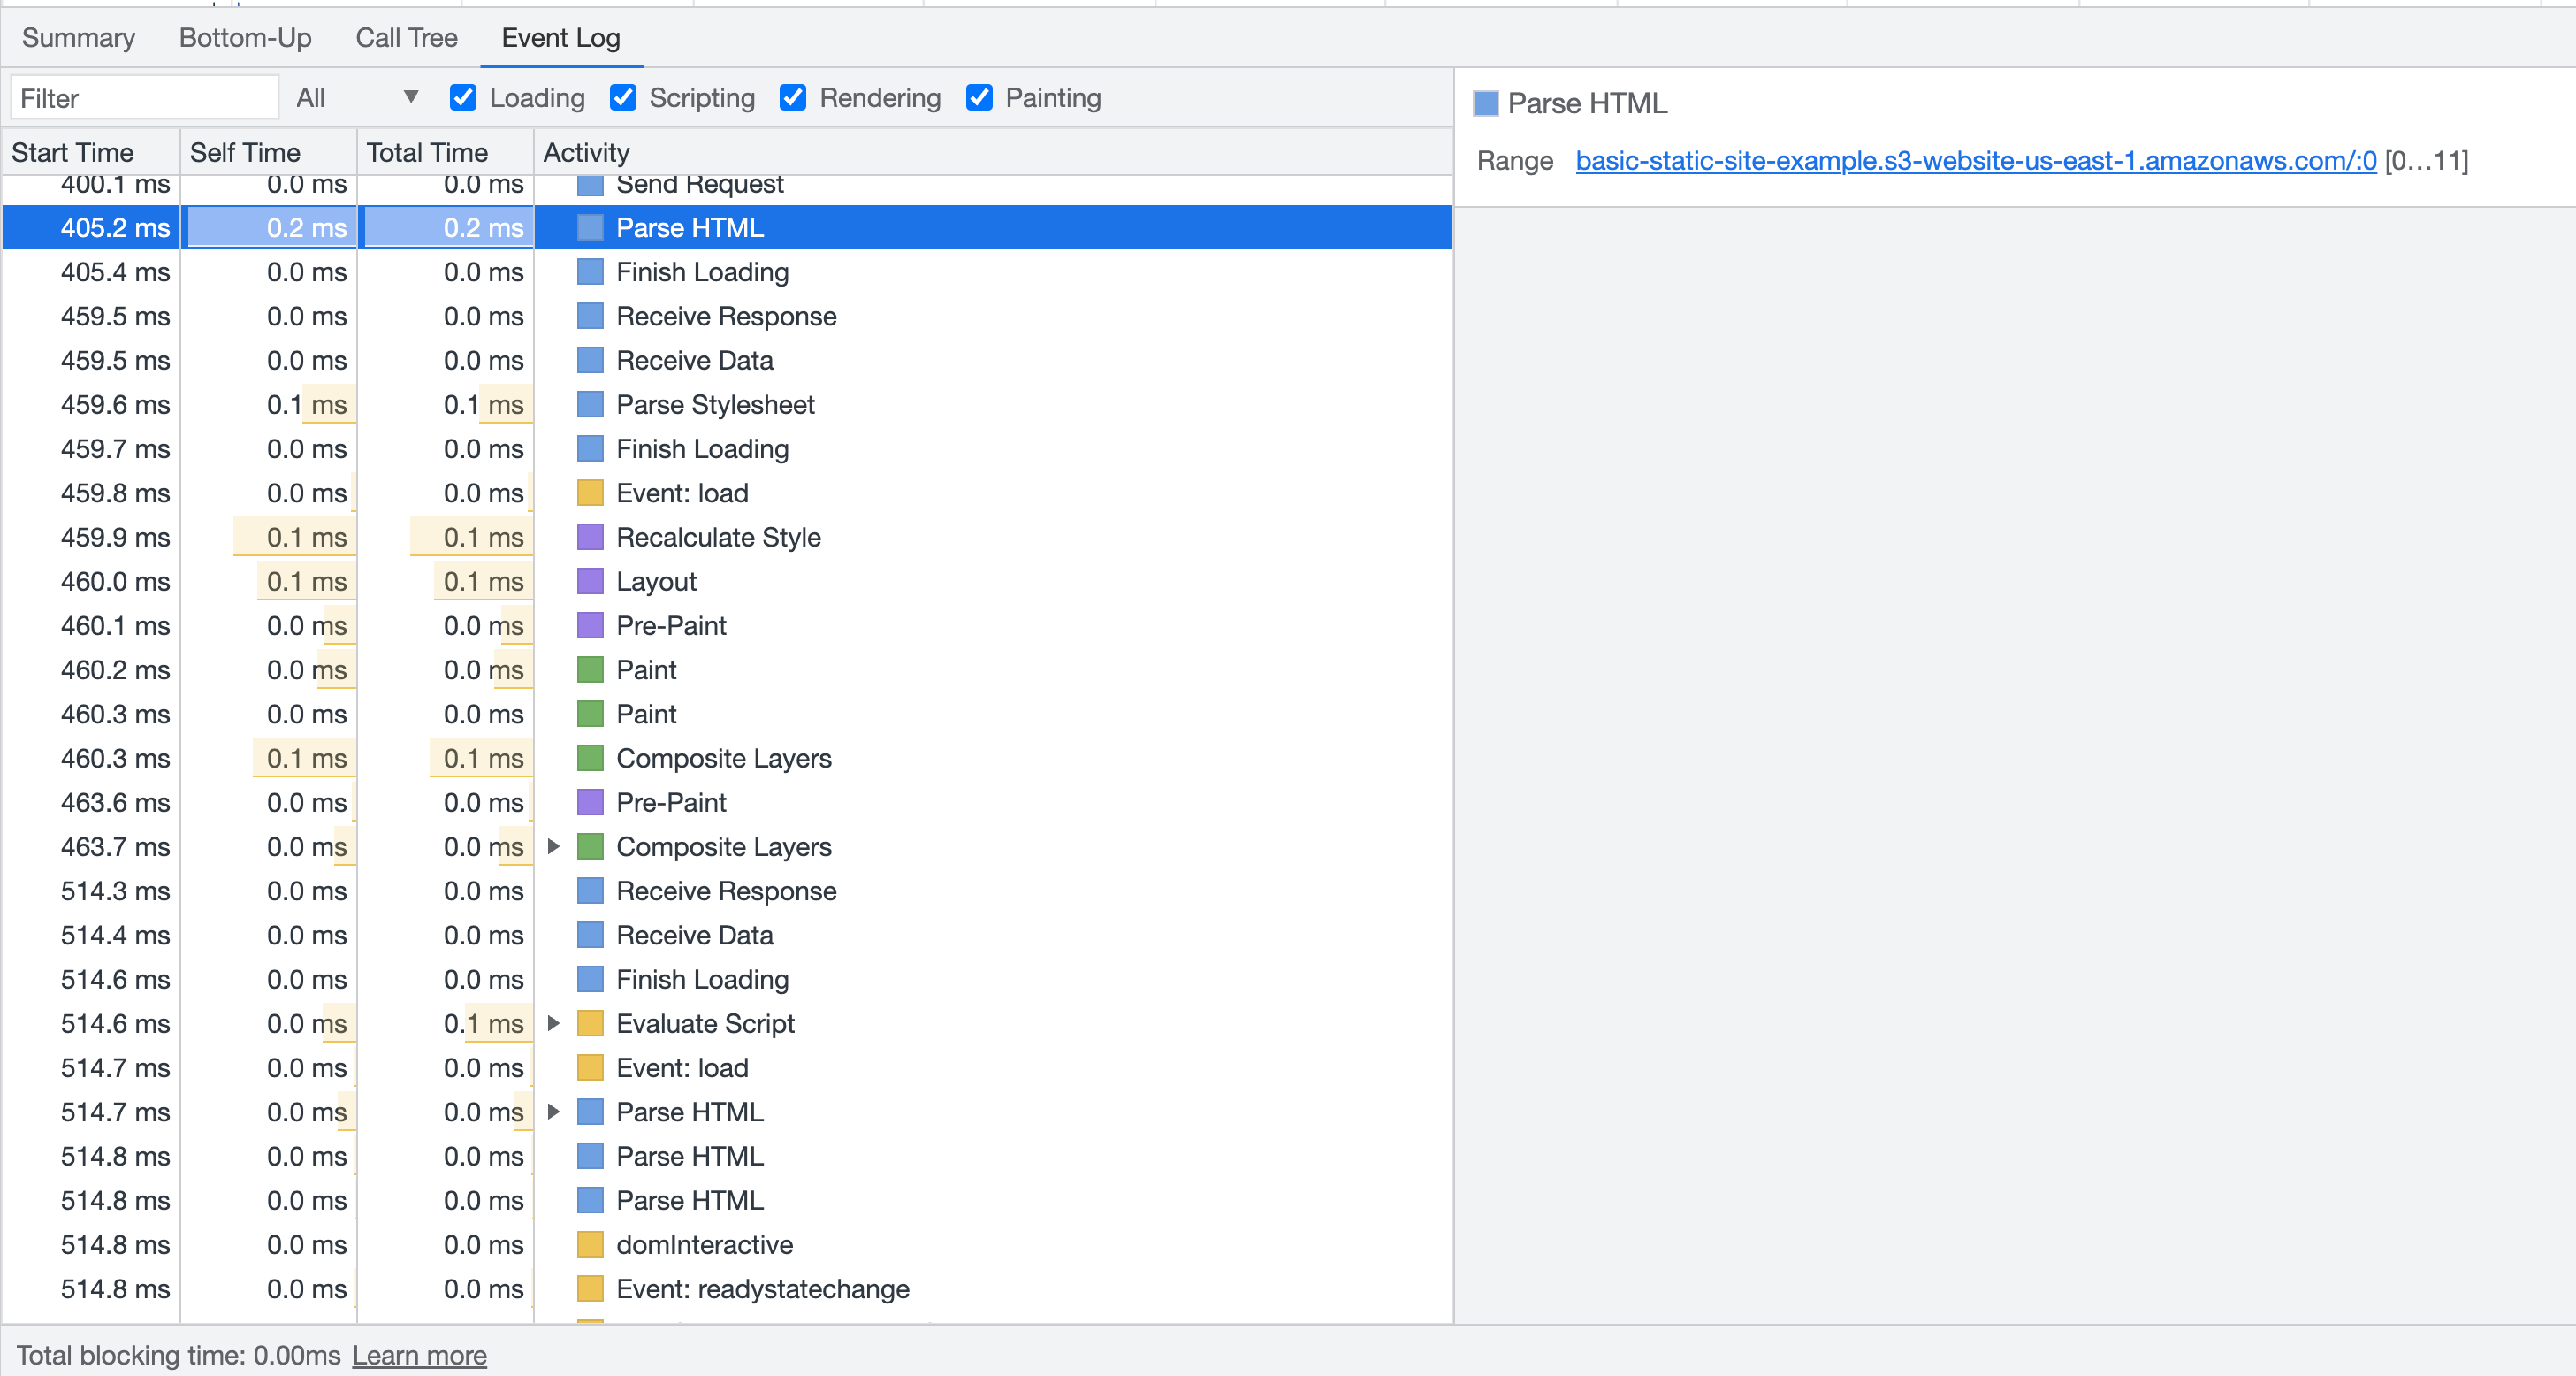
Anywhere you see Event: , this refers to DOM events that are fired on the window object
What next?
Understanding the CRP and how to visualize this in the browser dev tools is not something you'll be calling on in your daily workflow, but can be extremely helpful when debugging slow websites. Next time you encounter poor web vitals, be sure to use the dev tools profiler to see what part of the CRP is causing the slowness!