Table of Contents

What is HTML: Building a House Analogy
If we were building a house, we would have to follow three main steps:
- Build the structure (i.e. wood, concrete, brick, roofing, etc.)
- Set up plumbing, electric, water lines, and other functional requirements
- Make the house look good with paint, siding, and landscaping
If our house was a website, #1 is the HTML, #2 is the JavaScript, and #3 is the CSS.
You could live in your house with only the structure (HTML), but it wouldn't be pleasant.
You could live in your house with only the structure (HTML) and decorative touches (CSS), but unfortunately, you'd be living in a beautiful house where the toilets don't flush and the light switches don't turn on the lights.
HTML, CSS, and JavaScript work together. While the only true requirement for a webpage is HTML, a modern web developer must deeply understand the connection between the three and learn to use each effectively.
We're skipping CSS... For now
While you might see a few lines of CSS within this lesson (where necessary for an explanation of an HTML concept), the goal is not to learn CSS in this lesson.
We have plenty to learn with HTML alone! Don't worry though, the next lesson will be a CSS crash course :)
Remember, CSS is the styling of the web, and is not necessary to build a functional webpage.
Essential Concepts of HTML (HyperText Markup Language)
Like we did with the JavaScript section of this course, I'm not going to show you EVERY DETAIL of HTML. While we have far less ground to cover here than we did with JavaScript (HTML is much simpler), there are still HTML concepts that are overkill for you to learn if you are trying to become a web developer quickly.
For example, HTML has a "tag" (we'll talk more on this) called <table> which allows you to create tables. I could spend an entire lesson teaching you how to create and style tables in HTML, but I won't because even to this day, I use a table generator like this to create my HTML tables and styles. Here's a table that I created in a few minutes using the table generator tool.
This code above is hosted on Codepen, which we will be using frequently for the next few lessons. I recommend creating a free account so you can follow along.
Instead of spending all our time on something like HTML tables, we will be spending a lot of time on things like:
- Commonly used HTML tags (
html,body,head,div,p,input,span,h1,h2,img,button, etc.) - HTML attributes (
style,id,class)
Let's get started!
Basic Structure of an HTML document
This is what we call "HTML boilerplate", which just means that no matter what type of webpage you are creating, it will ALWAYS follow this structure.
<html>
  <head>
    <title>Site Title</title>
  </head>

  <body>
    <!-- This is an HTML comment

    It looks different than our JavaScript comments
    and can be used across multiple lines

    -->
  </body>
</html>
While this is all that is necessary for a webpage, here is a more "real world" version of HTML boilerplate.
<!DOCTYPE html>

<html lang="en">
  <head>
    <meta charset="utf-8" />

    <title>Example Site</title>
    <meta name="description" content="An example HTML site" />
    <meta name="author" content="Zach Gollwitzer" />

    <link rel="stylesheet" href="css/styles.css" />
  </head>

  <body>
    <script src="js/scripts.js"></script>
  </body>
</html>
You don't have to memorize this, but keep it handy.
(Optional section) For those curious, here is what some of that cryptic stuff means:
!doctype html- Tells the web browser to expect an HTML document. This is not an HTML element.lang="en"- Tells search engines and web browsers what language this webpage is written in. Here are all the valid country codes.charset="utf-8"- This defines what character set to use and is a very involved topic.<html></html>- The HTML container<head></head>- Stores all the metadata about the webpage<title></title>- Look up at the text in your browser's tabs. The contents of this will represent the tab name.<meta>- Nope, not<meta></meta>. Some HTML tags are "self closing". This just defines useful information for the browser and search engines to use when viewing the webpage.<link>- This allows you to connect your CSS stylesheet. We will be talking more about this in a future lesson.<script>- This allows you to connect JavaScript code to your HTML document. We will cover this later in the post when we talk about the document object model (DOM).
HTML Tags and Attributes
Here is the basic structure of an HTML element.
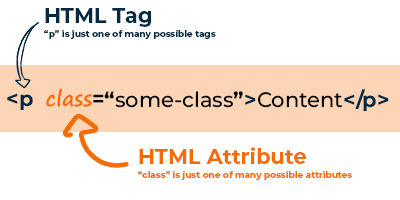
Let's walk through each piece here. Here is the most basic way to write HTML:
<p></p>
<p> is the "opening" tag that tells the webpage that we are starting an HTML element. </p> is the "closing" tag (notice the /) that says to the browser, "hey, I'm done with the contents of this HTML element.
There are many HTML tags available to you (you can see them all here), but as a web developer starting out, you will only need a handful of them to create beautiful webpages and apps.
Let's add some content.
<p>Here is some content</p>
You can write whatever you want within the bounds of the two HTML tags, <p> and </p>. Now, let's add an attribute.
<p class="my-first-class">Here is some content</p>
The word class is the attribute, and "my-first-class" is the value we are giving this attribute. Think about it like the JavaScript variables we covered in the prior lessons of this series.
const class = "my-first-class";
The above code is JavaScript, NOT HTML, but it is a very similar concept to the attribute shown above.
Just like you can use a variety of HTML tags, you can also use a variety of HTML attributes that will affect the behavior of that element.
We will talk about these tags shortly, but first, we need to make a few distinctions.
Tags vs. Elements
Before we get any further, let's distinguish between a "tag" and an "element". The terms are often used interchangeably, but I generally view an "element" as a complete unit while I think of a "tag" as a symbol.
Here's an element:
<p class="paragraph-style">Some content</p>
And here's a tag:
<p></p>
I will use "tag" to speak about function and "element" to speak about general structure.
Types of HTML tags
In my head, there are two levels of classification when it comes to HTML tags. This page classifies HTML tags into many more categories, but I think my simplified view will help you as a beginner.
- Normal vs. "self closing" tags
- Container vs. Standalone tags
Normal vs. Self-Closing Tags
Most HTML tags have an "opening" and "closing" component to them. Here are some examples.
<p></p>
<h1></h1>
<div></div>
<span></span>
<strong></strong>
But some elements are what we call "self-closing". Here are common examples.
<img />
<input />
<meta />
<link />
You can nest elements within a normal HTML element while you cannot nest elements within a self-closing HTML element.
<!-- Correct usage -->
<div>
  <p>some content</p>
</div>

<!-- INCORRECT usage (will not render) -->
<img <p>some content</p> />
Container vs. Standalone tags
We know that we cannot "nest" or "embed" elements within a self-closing HTML element, but when should we be nesting HTML elements within the "normal" elements?
For example, the following HTML is valid, but should we write it this way?
<p>
  Some content
  <p>some nested content</p>
  <div>more nested content</div>
</p>
NO!! While this HTML will render in the browser, it is improperly using the HTML tags. Some HTML tags such as div, table, ol, ul, and body are meant to have nested elements within them. Other HTML tags such as h1, h2, h3, h4, h5, h6, p, and strong are not good as "containers" for other elements.
To learn more, let's look at a list of common HTML tags.
Common HTML Tags
To avoid being a complete redundancy of all the great resources that document HTML tags, this section will provide you with the most common HTML tags that I use as a full-stack developer.
Remember, this is not an exhaustive list, but rather the essential tags you'll need to know. You can visit this reference page for all available tags.
The Codepen below has two sections. On the left is the HTML code. On the right is the output.
Study these common tags for a few minutes, but don't obsess over memorizing them. We will do a challenge exercise later in this lesson that will help you apply the concepts. Additionally, you can always look them up in the documentation. I suggest opening this in Codepen for a full-screen view.
HTML is NOT case-sensitive!
As you were looking through the HTML, you might have noticed that all of the tags were written in lowercase letters. This is generally how you should write HTML, but the following code is valid too.
<div>
  <p>HTML is not case-sensitive</p>
</div>
Line breaks do not affect HTML
You also might have noticed when looking through the code that there was a significant space between blocks of HTML code, but in the output, those same spaces did not exist.
You might think that the following code would result in a large space between the paragraphs:
Global Attributes vs. Element Attributes
Again, here is an HTML element.
The attribute class is a global attribute, but what exactly does this mean?
It would be useless for me to walk you through ALL of the possible attributes for ALL HTML tags. Instead, you need to understand how they work.
Remember in the prior lesson where we talked about the various JavaScript objects and their built-in methods?
And remember when we tried to call an Array method on a String data type?
const str = "i am a string";

// This won't work because reverse() is a built-in method
// on Arrays, NOT Strings!
str.reverse(); // TypeError: str.reverse is not a function
HTML attributes are very similar to these object methods. Each HTML tag (p, div, img, etc.) has a set of element attributes that can be used on them to modify their behavior and styling. There are also a set of global attributes that can be used on ALL HTML tags.
For example, you CAN put a src attribute on an img tag.
<img src="https://www.somewebsite.com/images/image1.png" />
But you CANNOT put src on a p tag.
<!-- INCORRECT -->
<p src="https://www.somewebsite.com/images/image1.png">Some text</p>
It won't throw an error, but it won't do anything useful. This is because src is NOT a global attribute. It is an element-specific attribute that pertains to img tags.
On the other hand, you COULD do the following:
<img class="some-style" src="https://www.somewebsite.com/images/image1.png" />
<p class="some-style">Some text</p>
Above, we are using the class attribute on both elements because it is a global attribute.
Mid-Lesson Code Challenge
To check your knowledge, we are going to stop here and apply the concepts we just learned.
- Create a Codepen account for free
- Open this Pen and click "Fork" in the bottom right corner of your screen. This will allow you to edit it on your own account.

- Solve the challenge below, and tag me with your solution on Twitter @zg_dev! Be sure to use the #100DaysOfCode hashtag in your Tweet!
A few hints:
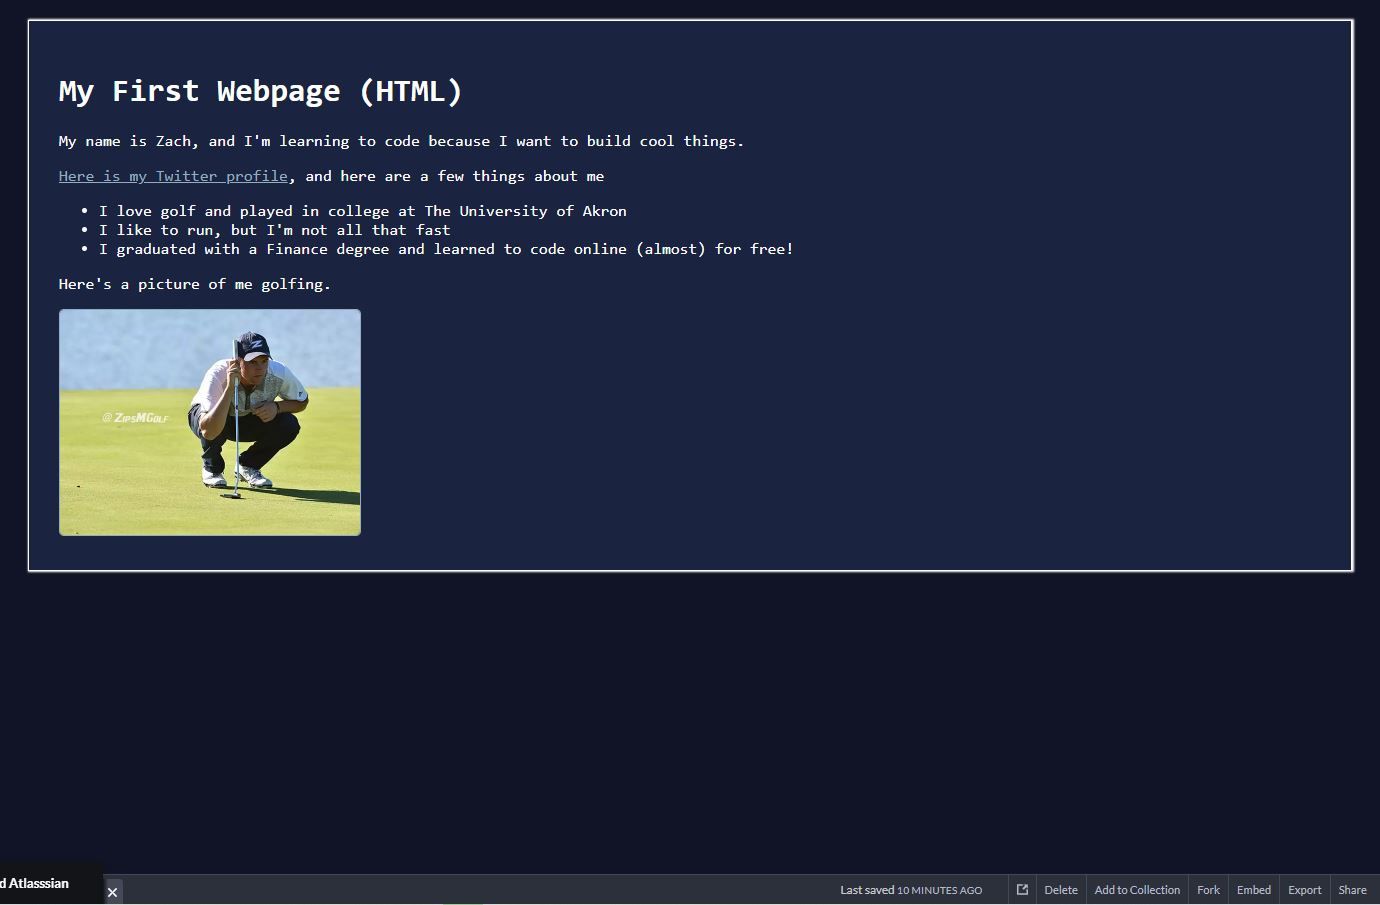
- The big text is an
h1element. - Don't worry about the colors, borders, and text styles. They will happen automatically if you build it correctly with the HTML
- Be sure to personalize the content (including links) so you can share it! You can share it on Twitter by clicking that share link at the bottom right corner of your Codepen page.
- Here is the solution, but don't cheat yourself! Give it a try first!
How to follow along for the rest of this tutorial
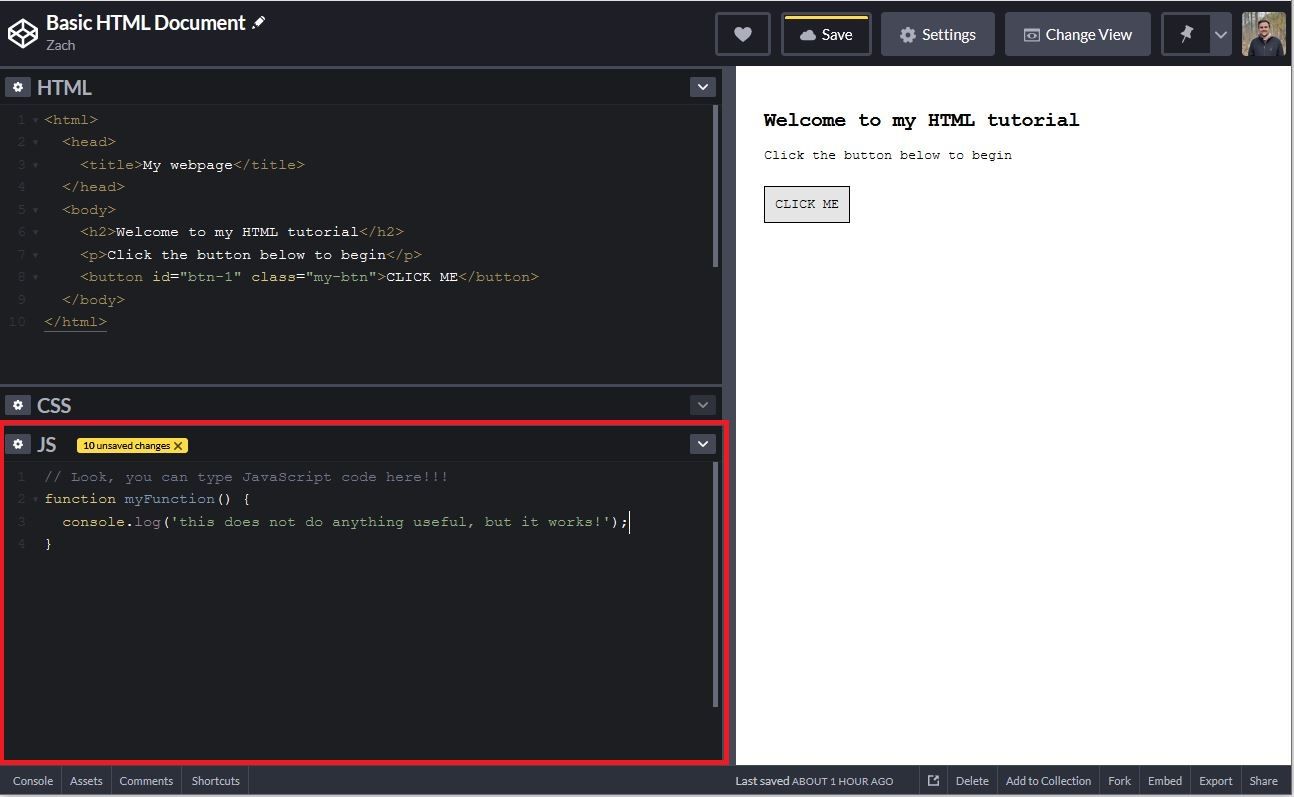
In the next part of this lesson, we will be connecting some JavaScript with a Codepen HTML document. Here is how you can follow along.
First, you'll notice that in each Codepen "Pen", there is a section for HTML, CSS, and JavaScript. Any JavaScript you type into the JavaScript section will be automatically connected to your HTML document. Normally, you would have to do something like this:
<!DOCTYPE html>

<html lang="en">
  <head>
    <meta charset="utf-8" />

    <title>Example Site</title>
    <meta name="description" content="An example HTML site" />
    <meta name="author" content="Zach Gollwitzer" />

    <link rel="stylesheet" href="css/styles.css" />
  </head>

  <body>
    <!-- Normally, you have to manually connect your JavaScript code to your HTML code
          like we are doing here.  We will talk more about this later.
    -->
    <script src="js/scripts.js"></script>
  </body>
</html>
With Codepen, all of this is automatically taken care of for you. All you have to do is start typing some JavaScript in the designated area.
But... What if you want to experiment around with some JavaScript before typing it here? You have two options:
- Use Codepen's built-in Console (bottom left corner)
- Use the browser console
Unfortunately for us, option #1 isn't great because Codepen's console isn't very interactive. Option #2 isn't great because within the Firefox browser (which we have been using in this series), the dev tools console does not properly connect with Codepen.
I hate to come up with a workaround solution for us, but here it is... I suggest using Google Chrome with your Codepen Pens. Don't worry, these problems won't exist once we start developing locally, but for now, it's what we have to deal with. So open Google Chrome, and once there, you can use the dev tools to interact with your Codepen.
Finally, make sure the "CodePen" is selected for the JavaScript execution context: