Table of Contents

Why this post?
Let me start by contradicting the title of this post. The lifecycle of a React functional component is far from secret. Actually, it's thoroughly explained in the new React documentation.
But if I had to guess, I'd say despite the available information, a majority of React developers don't understand how their components work at a deep level. While this may sound like a bold statement, it comes from a place of self humility; a place that I spent a lot of time in myself. Despite having built lots of cool things with React over the years, I always had seemingly simple questions lingering in my head:
- How does React work?
- Do I need
useMemoanduseCallbackhere? - Is this the right way to
useEffect? - What does a "re-render" actually mean?
- How do I deal with non-React code?
There are tons of blog posts on the web talking about these things. But from what I've found, few of them agree with each other, some are outdated, and only a handful talk about the "behind the scenes" stuff that we all should know but don't.
What is this post about?
In this post, you will learn all the "behind the scenes" logic that React uses. I will cover each of these topics in depth with a focus on the lifecycle of a React component:
- How React initializes
- The lifecycle of a basic React FC (trigger, render, commit)
- How "state" works in React
- Storing values outside of React state (
useRef) - Dealing with external systems (
useEffect) - Thinking about performance (
useMemo,useCallback, Profiler)
This post will not cover everything (see official docs). Instead, this post is about connecting the dots and making sure you understand the core mechanics of React and know how to handle the most common use-cases correctly with this knowledge.
Prerequisites
This is an intermediate level post.
Note to ambitious beginners: I highly recommend reading this post now, absorbing as much as you can, and revisiting it after you have built a couple projects in React. The first read will be challenging.
To get the most out of it, you should...
- Have a general understanding of web programming (state management, async requests, APIs, etc.)
- Have experience building basic React applications
- Have general comfort with TypeScript (I use it throughout the post w/o explaining)
Chapter 1: Initializing React
How does React actually get something on the screen?
It starts with a plain 'ole HTML document:
<!DOCTYPE html>
<html lang="en">
  <head>
    <meta charset="UTF-8" />
    <meta http-equiv="X-UA-Compatible" content="IE=edge" />
    <meta name="viewport" content="width=device-width, initial-scale=1.0" />
    <link rel="stylesheet" href="globals.css" />
    <title>Document</title>
  </head>
  <body>
    <div id="root"></div>
    <script src="bundle.js"></script>
  </body>
</html>
By itself, this HTML document doesn't show much of anything. There are two very important elements here, and we'll start with this one:
<script src="bundle.js"></script>
What is bundle.js? For the remainder of this tutorial, you can think of bundle.js as "my entire React app in one file".
How did our entire React app get into a single file? Well... That's a bit of a distraction from the topic of this post, so I'll point you to my Vanilla TypeScript + React + Webpack post, which explains how we take a React app and put it in a bundle.js.
In short, we must use a build tool like Webpack to read through all our React files and intelligently combine them into a single, optimized file called bundle.js (or multiple bundles via code splitting, but that's for another day).
So... What does bundle.js actually do? Let's take a look at something you'll see in every React 18 application:
import { StrictMode } from "react";
import { createRoot } from "react-dom/client";
import App from "./App";

const rootElement = document.getElementById("root"); // HEY! LOOK HERE!!
const root = createRoot(rootElement!);

root.render(
  <StrictMode>
    <div>Your React App component</div> {/* We will add this soon */}
  </StrictMode>
);
Remember that second important line in our plane 'ole HTML file above?
<div id="root"></div>
Yeah, that thing. It's super important because when you open your browser to the location serving this app, React is going to initialize your app:
- Your "plane 'ole HTML" document is loaded in the browser
- Your browser fetches
bundle.js, which includes the entire React library alongside your React application + components (remember, Webpack bundled all this together for you) - React knows about your initialization file and will run the code above.
- First, React will locate a
divwithid="root"in theindex.htmldocument. Once it finds it, it passes the element reference to the React library, which calls a special method,createRoot(rootElement). - React now takes the newly created root and calls its
rendermethod, passing your entire React application to it. On the first load of the page, React uses the built-in DOM APIappendChildto place your application elements inside the root element it has just created.
At this point, React has complete control over your lone index.html file and can do whatever it wants. All because of two simple lines:
<div id="root"></div>
<script src="bundle.js"></script>
So your app is loaded. Now what?
Chapter 2: A Component's Lifecycle (trigger, render, commit)
React works in 3 phases, which every React dev should understand, but many (including my past self) don't.
Phase 1: Trigger
Have you ever thought how React got its name?
While it requires a bit of speculation, the intuitive conclusion would point towards origins of reactive programming, and more recently with the move to functional components, functional reactive programming. That said, React is not a pure reactive paradigm as explained in the design principles. Nevertheless, many reactive concepts still apply.
Reactive programming is a declarative way of writing code. In React, this can be translated to, "hey React, I just changed the state, now go figure out how to re-build the webpage with it".
In a React app, there are three primary "triggers" that cause React to schedule a re-render.
- The browser is loaded/refreshed (initial page load explained above)
- The component's state changed (via
useStatehook) - The component's props changed
Given the props of one component are affected by the state of ancestor components, in a circular sense, every trigger is caused by state changes.
When the state changes, React does the following:
- Determines
xyzcomponent as the origin of the state change - Updates the state of
xyzcomponent - Schedules a re-render of
xyzcomponent with the new state as an input
So... What's a "re-render"?
Phase 2: Render
React's term "render" can be misleading. Why? Because when React enters the "render" phase, it is not actually changing the DOM at all, and typically, "rendering" is the process of actually making visual changes to the browser screen.
React's version of the term is different. To React, "to render" means to calculate the changes to the DOM and represent the results as a virtual DOM.
- DOM - the in-browser JS representation of your HTML (what the user sees)
- Virtual DOM (VDOM) - the calculated representation of the DOM (what React sees)
Why is the VDOM useful to React? Because it allows React to calculate, or "render" state changes without actually affecting what the user sees... Yet.
So when you see the term "render" in the React world, here's a simplified set of steps you can remember.
- In the prior step, a state change on
xyzcomponent triggered a "render" - React will now call
xyzcomponent as a pure function and calculate the VDOM as a "snapshot" based on the latest state. - React will reconcile the difference between the prior snapshot and the calculated one (i.e. compares the real DOM to the VDOM)
- If there is a difference in the snapshots, we move on to phase 3. If not, no changes are made to the real DOM.
Step 2 is over-simplified above. Most applications will have many React components nested within each other.
<ParentComponent>
  <ChildComponent />
</ParentComponent>
Let's say ParentComponent triggers a state update (step 1). In step 2, React will recursively call all components starting at the component that triggered the update. React will first call the parent component as a pure function, ParentComponent(props), which will then discover the child component and call it as ChildComponent(props). This process will continue until there are no more components in the tree to call.
Dev concerns vs. React concerns
Before we move on to the final phase, I want to pause to highlight some important distinctions.
The "render phase" is the most time-consuming and computationally expensive phase in a React component's lifecycle. In the steps I outlined above, 1-2 generally fall on the developer, while 3-4 are React's internal concern.
It is your job to keep your components pure and manage your state updates efficiently.
It is React's job to process state updates, schedule a re-render, and reconcile the real DOM to the VDOM to find the fastest and most efficient way to sync the two via DOM APIs based on your state updates. Scheduling and reconciliation represent a huge part of React core and rely on an engine called Fiber to do it. The details of this are vast and not in the scope of this post, but the links above are great places to start if you're interested.
Phase 3: Commit
After React has rendered the VDOM and created a snapshot of your component(s), it will compare these with old snapshots and decide which components (if any) are different.
Those that are different will be "committed" to the real DOM by leveraging the browser's built-in DOM API. React uses the react-dom package as the "middleman" between the VirtualDOM and the real DOM, providing helpers to make updates and keep the two in sync.
Remember, on the first page load, React uses appendChild. On subsequent page loads, it would be a performance nightmare if the entire app had to rebuild, which is why React goes through the prior render phase to determine where to make changes.
An important note on Strict Mode
Before we get any further, it is critical that we understand what <StrictMode> is doing for us in our app's root.
root.render(
  <StrictMode>
    <App />
  </StrictMode>
);
Strict mode is 100% optional and can be used for all or part of your React application. It only applies in development.
Why should you care?
You can think of Strict Mode as a development helper that proactively detects two main categories of faulty React code:
- Usage of legacy APIs - like any library, there are things that the developers implemented in the past that no longer make sense to use. React is no different, and after many releases, the core team decided that certain ways of using React (legacy string refs, class components, etc.) are no longer "best practice" and will become deprecated. Strict mode checks your code for usage of these "legacy" practices and warns you in the console.
- Keeping your components free of side effects - in React, components should be pure, and Strict Mode has a mechanism for ensuring this is true in your app. In Strict Mode, React double-invokes your component functions. Why? Because if your FCs are "pure", the React renderer should get the same result both times. This also ensures that all your
useEffectcalls are properly "cleaned up" (more on this later).
Because of all this, while in development mode, you will see things happening twice. For example, let's add a console.log to our app:
export default function App() {
  console.log("App.tsx just rendered"); // This will show up 2x

  return <p>Empty app (for now)</p>;
}
In the console, you'll see this:

If you are working in React 18.x+, the second render will be greyed-out. Again, this will NOT happen 2x in production.
Using the React Dev Tools Profiler
To write good React code, you need to understand how to measure it. This typically happens from two primary angles:
- How fast did your component render?
- How many times did your component render?
You can check the number of re-renders with a simple console.log, but it doesn't give you true insight into the lifecycle we talked about in prior sections.
export default function App() {
  console.log("App.tsx just rendered"); // works, but not great...

  return <p>Empty app (for now)</p>;
}
One of the best ways to level up as a React dev is to learn how to use the dev tools:

These are the React Developer Tools (i'm using Chrome). This post assumes that you have skimmed this walkthrough and are aware of the main features available in these dev tools (should take a few minutes).
The reason I'm introducing these now is because I will be using them throughout the remainder of the post to demonstrate concepts. To start, let's take a look at our basic app after a single browser refresh:
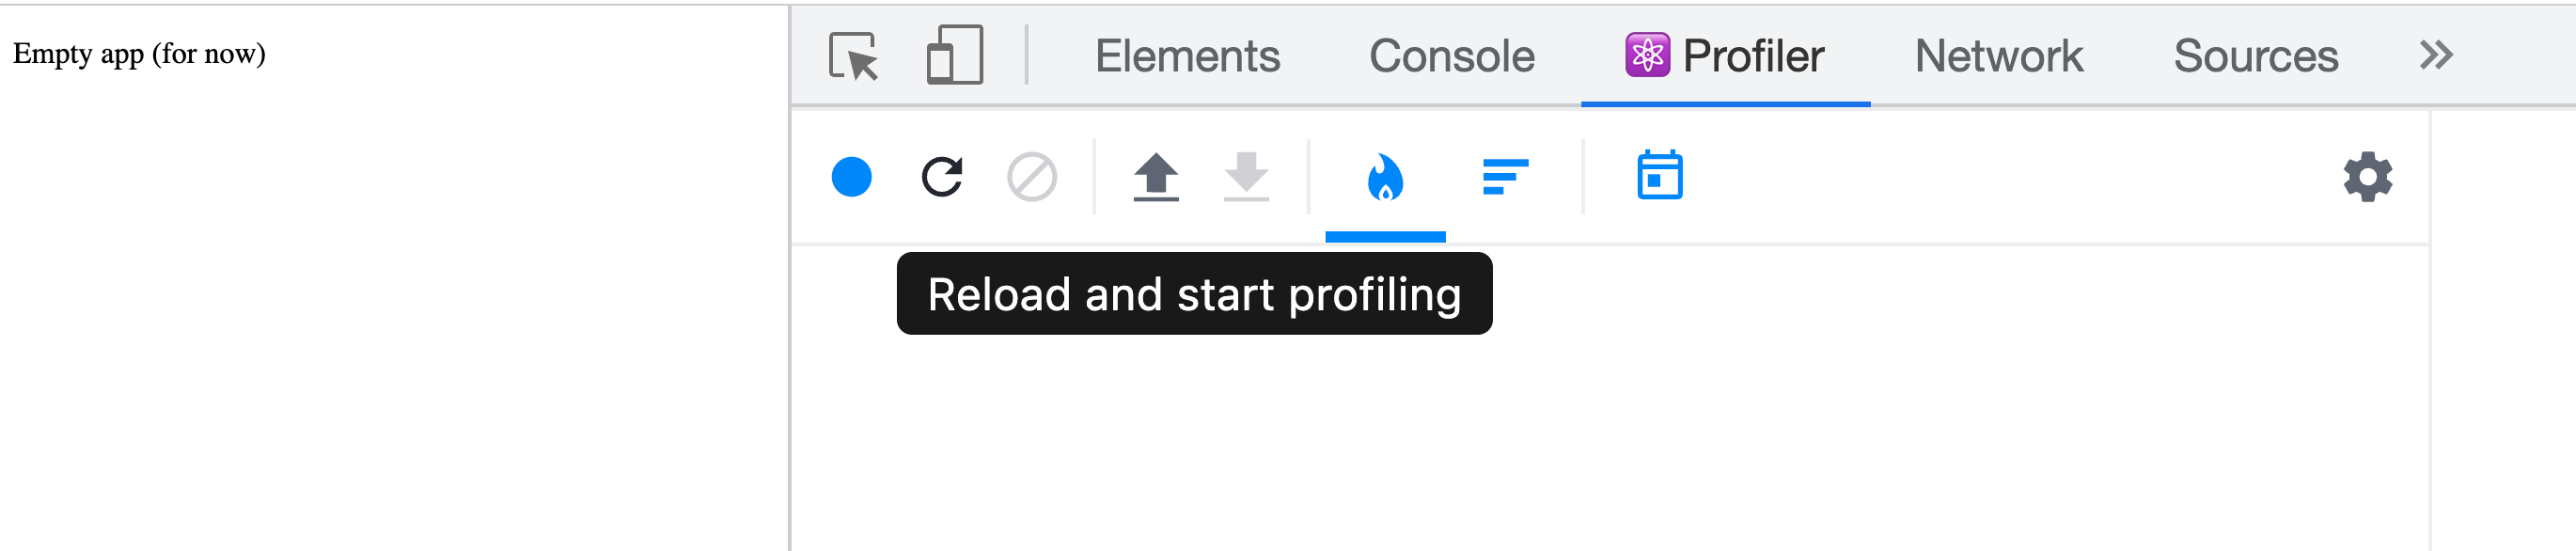
After I reload the browser with profiling turned on, I get this flame graph:
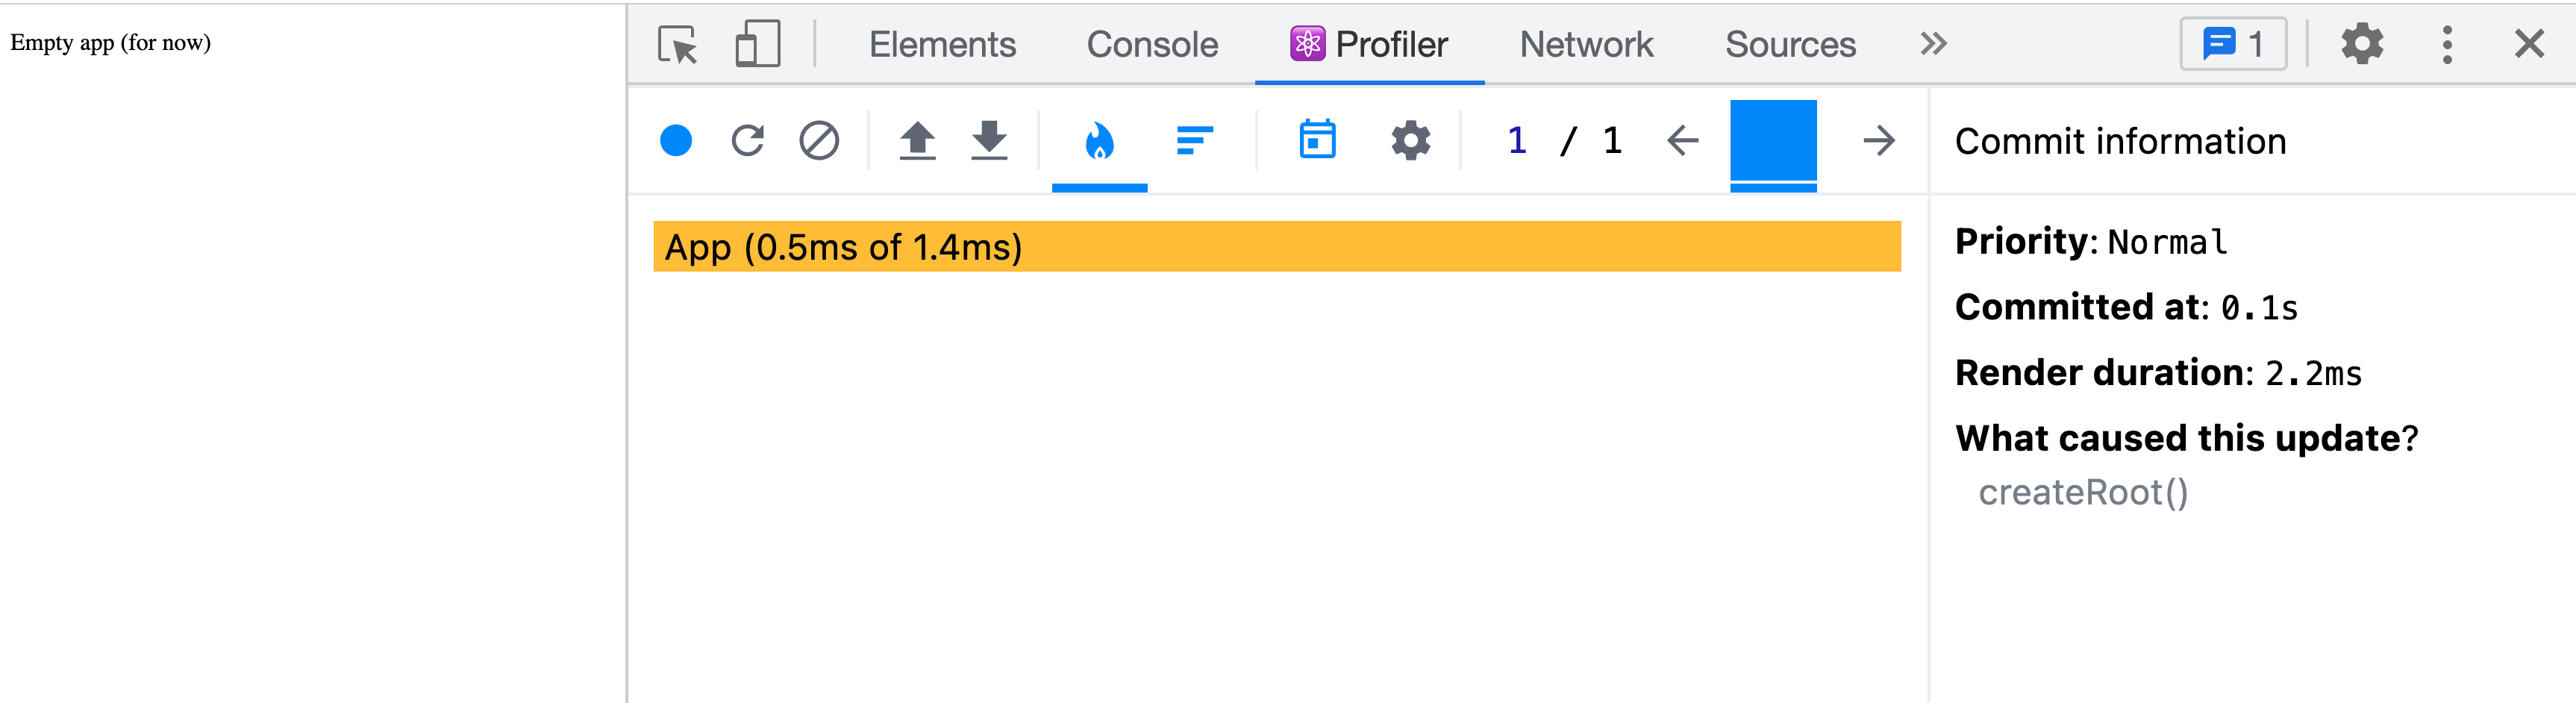
Remember our lifecycle from above (trigger, render, commit)? The Profiler shows each of these phases to us!
- Trigger - on the far right of the screenshot, you can see a "What caused this update?", which indicates that
createRoot()was the trigger for our re-render. This makes sense since the only thing that happened was the initial page load, and every time the page loads, we have to initialize our React app (explained in prior section) withcreateRoot. - Render - React must now start at the root of the app and recursively walk down the component tree. For each component, it will call the internal render method and construct a VDOM representation of the app. We only have one
Appcomponent, so you only see one colored bar in the chart. The total render process here took2.2ms, while theAppcomponent + its children took1.4msof this total. When you see0.5ms of 1.4ms, this just means that the actualAppcomponent render only took0.5mswhile its children (the text) took1.4 - 0.5 = 0.9msto render. And finally, our1.4msdoesn't equal2.2msbecause there is some additional overhead to rendering outside of just the components themselves. This will all make more sense as we dive into more examples throughout this post! - Commit - Finally, you can see how many times React "committed" the changes to the DOM (visual changes). In the screenshot above, you can see a blue square next to "1 / 1". This tells us that on page refresh, we had one commit, and that commit is currently showing. As our application gets more complex, you'll see multiple commits here indicating that our application state has changed and the UI has re-rendered and re-committed the results to the DOM.
Now that you have a basic understanding of the React Profiler, it's time to talk about React state!
Chapter 3: How React State works
Remember from earlier, building UIs in React is a declarative way of programming, which means that instead of building a UI, setting up a bunch of event listeners, and implementing specific DOM API methods in each event listener, we instead say, "Hey React, here is my new state. Go figure out how to change the screen to reflect it".
Example App
To learn more about state, we need a bigger app! Here's what we're working with:
Button- a custom button component we will enhance laterVideoPlayer- a custom video player we will enhance laterApp- Simple UI that displays a video and tracks how many times a user has clicked play
import { PropsWithChildren, useState } from "react";
import "./App.css";

function Button({ children, onClick }: PropsWithChildren<{ onClick(): void }>) {
  return <button onClick={onClick}>{children}</button>;
}

function VideoPlayer({ src, onPlay }: { src: string; onPlay(): void }) {
  return (
    <>
      <video src={src} controls />
      <div className="video-buttons">
        <Button onClick={onPlay}>Play</Button>
      </div>
    </>
  );
}

export default function App() {
  const [playCount, setPlayCount] = useState(0);

  return (
    <main>
      {/* A custom video player */}
      <VideoPlayer
        src="https://media.zachgollwitzer.com/js-assignment-operators.mp4"
        onPlay={() => {
          setPlayCount(playCount + 1);
        }}
      />

      <div>
        <h2>Statistics</h2>
        <p>Play count: {playCount}</p>
      </div>
    </main>
  );
}
What causes state to change?
In general, there are two primary causes of a state change:
- User interaction (i.e. DOM events such as
onClick) - Effects (i.e.
useEffect)
We aren't ready to talk about effects yet, so bookmark that one in your head for later.
The next sections will focus on DOM events.
In our app, we have a single event, which is a button click. When the Button is clicked, its onClick handler will call the onPlay prop, which is handled by VideoPlayer.
Not all events trigger state updates, but in a majority of cases like ours, they do.
How state works in React
In this simple app, when the play button is clicked, we reach an event handler function in VideoPlayer that does the following:
onPlay={() => {
  setPlayCount(playCount + 1);
}}
While as the developer, it appears that playCount is a dynamic variable, after the initial page load, React sees this a bit differently:
onPlay={() => {

  // 0 is the current "snapshot" value of playCount
  setPlayCount(0 + 1);
}}
Remember, during the first render of the app, React will create a Virtual DOM representation of your app as a snapshot. After the first page load, the "snapshot" value of playCount will be 0 since that's what we initialized it to:
const [playCount, setPlayCount] = useState(0);
Once we click the play button, it triggers a series of events that will update this state value and trigger React to schedule a re-render.
- The
onPlayhandler is invoked by a user click - The
setPlayCountmethod is invoked by the handler with a value of1 - React updates its internal
playCountvalue to this new value of1, which triggers (phase 1) a scheduled re-render. - React starts the render phase by picking up this scheduled re-render and in doing so, invoking the component that triggered it. React calls
App(), which recursively calls all child components and constructs a VDOM representation using the new state value of1to do so.Apptriggered it because the state value lives in the scope ofApp, NOTVideoPlayer, even thoughVideoPlayercalled the method that performed the state change,setPlayCount
- React compares the prior VDOM snapshot to the new one, and determines that they are different (specifically, anywhere that the
playCountvariable exists in the JSX) - React uses
react-domto commit the changes
Let's now take a look at the Profiler flame graph to verify the results. Here is our initial page load (before anything is clicked):
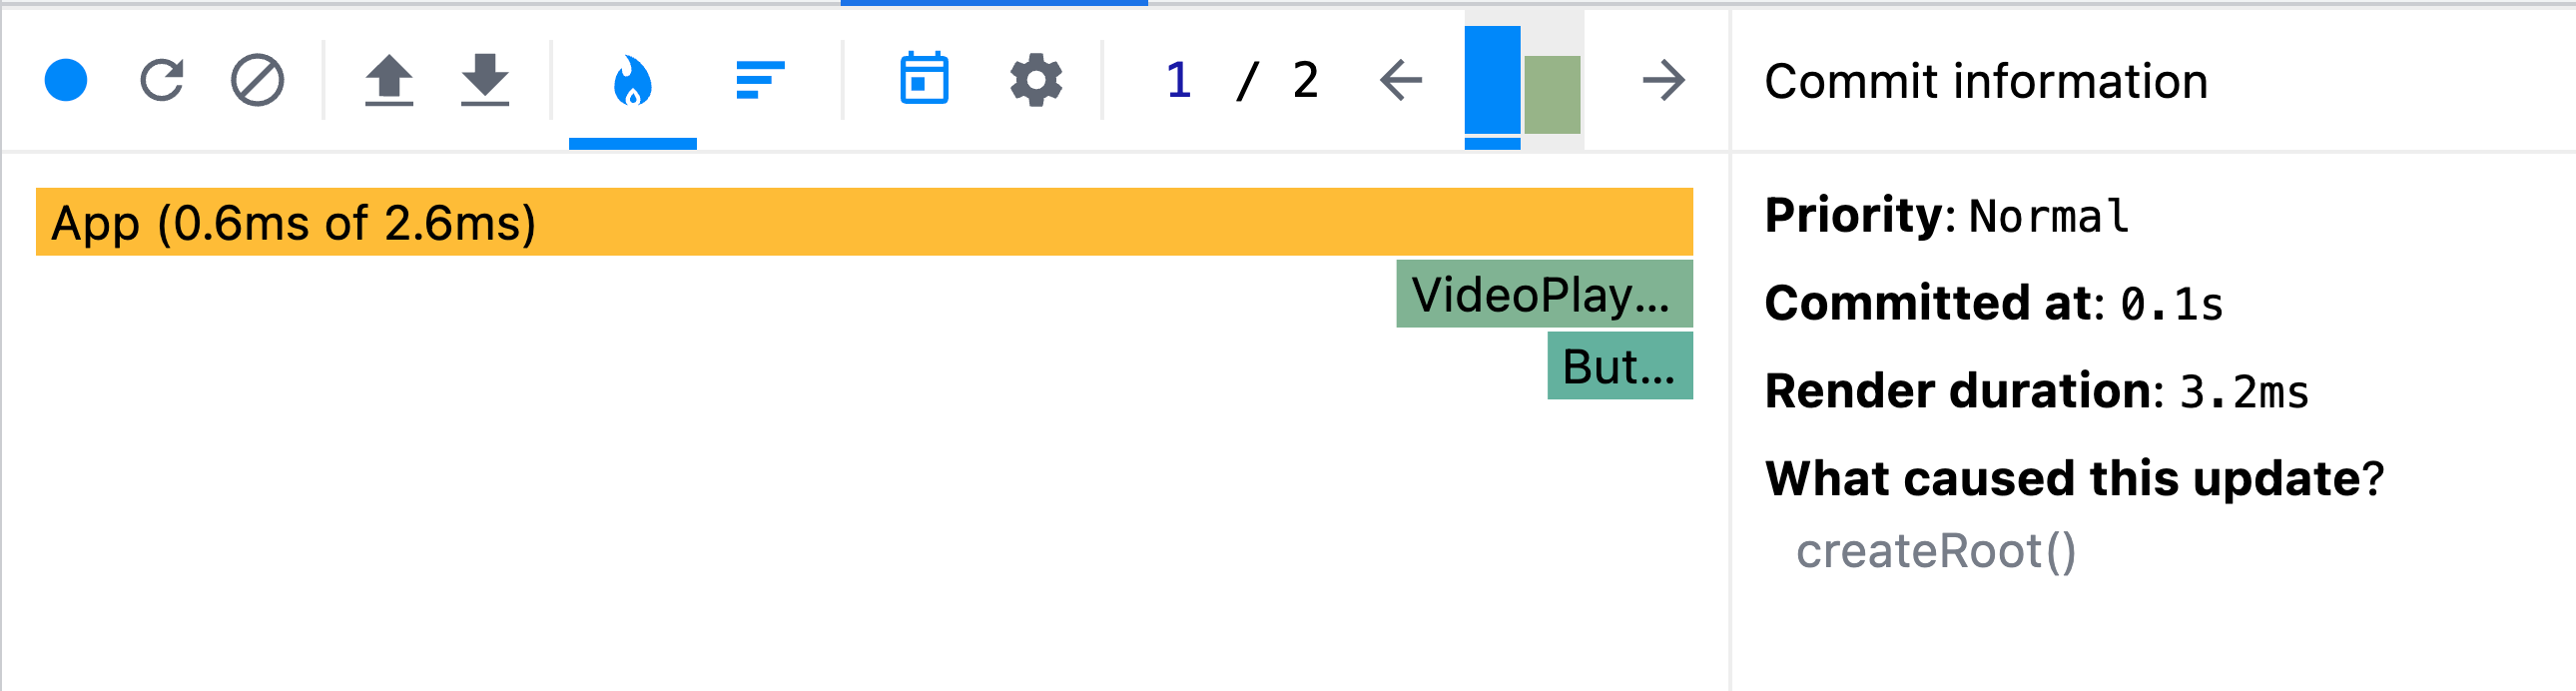
As expected, we see all 3 components (App, VideoPlayer, Button) load. In total, it took 3.2ms for this render phase, and App + all children took 2.6ms of that total.
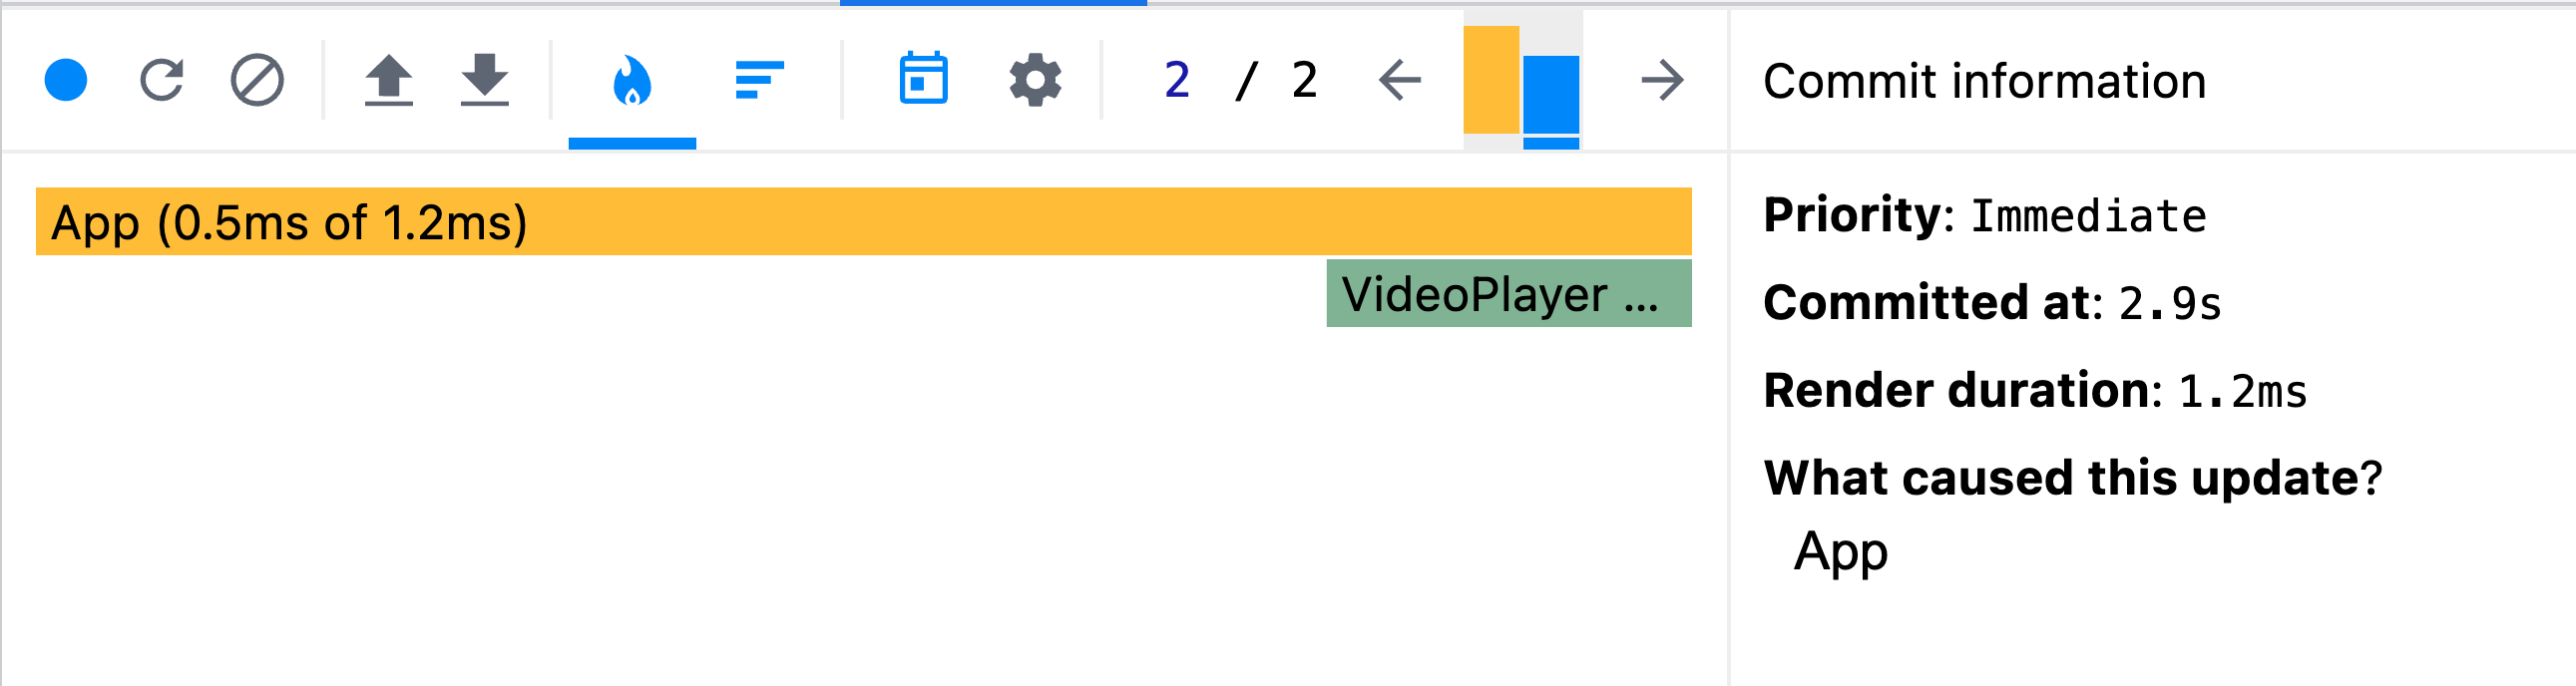
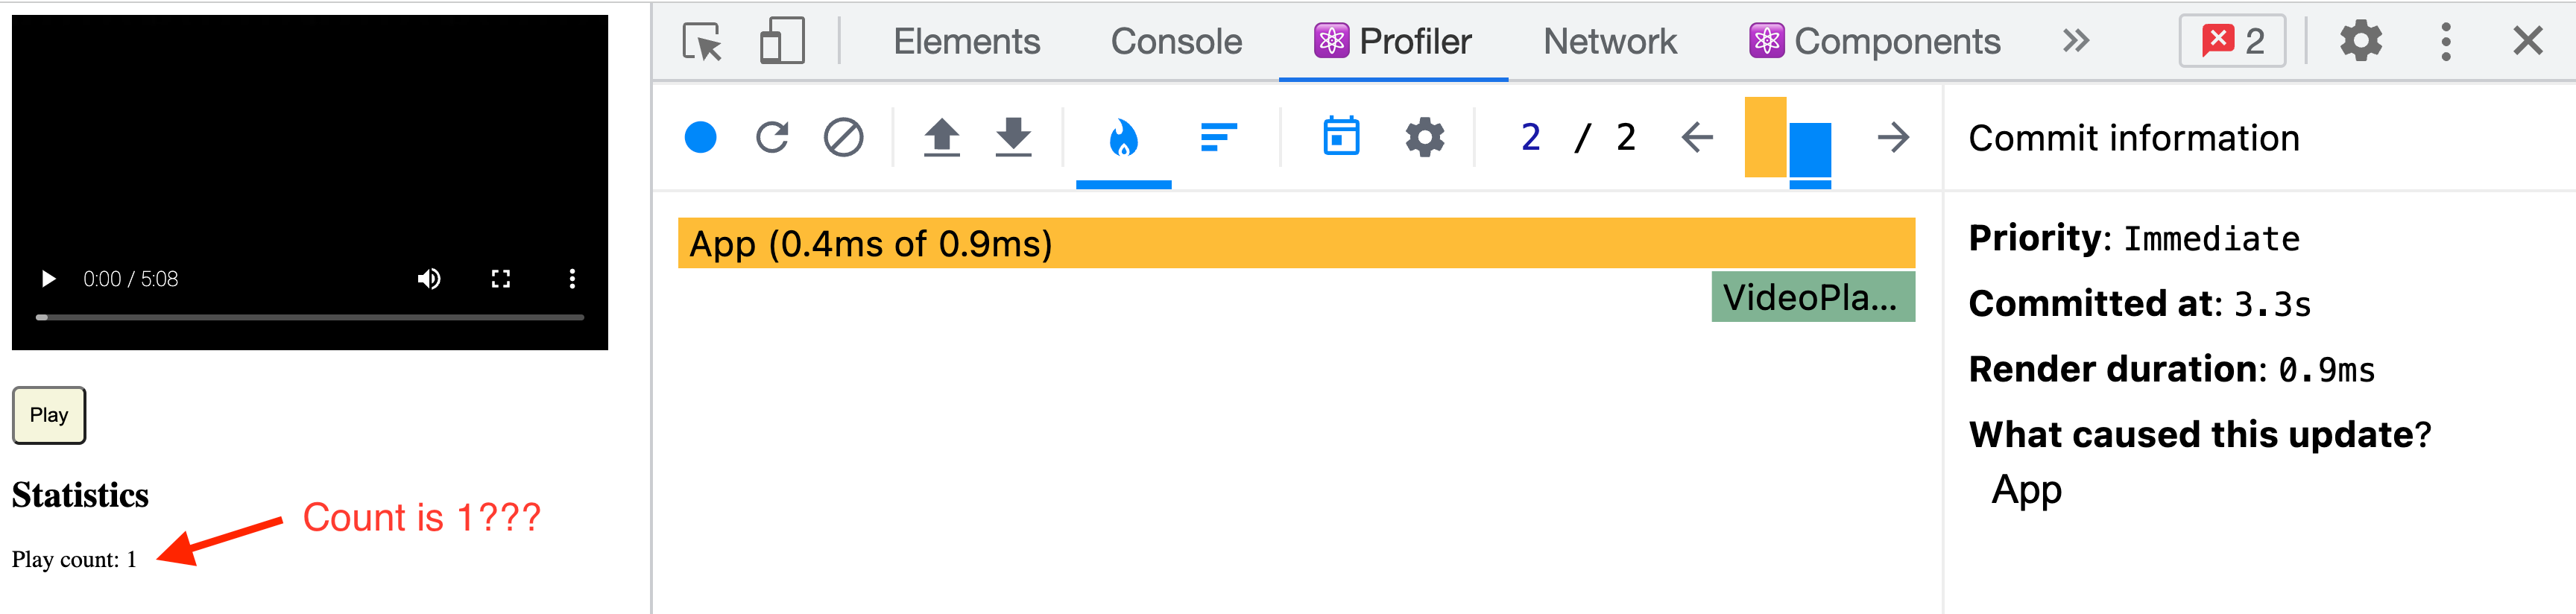
The second commit happens after I click the "Play" button, which calls setPlayCount as explained above. You'll notice two things:
- "What caused this to update?" identifies that the
Appcomponent triggered our re-render Buttondid NOT re-render at all because it was not affected by the state change, and React is smart enough to save resources and leave it alone during this render cycle!
How state snapshots work
From the prior section, I mentioned "snapshot" several times, but what does that mean?
To demonstrate, I'm going to make one change to our code:
<VideoPlayer
  src="https://media.zachgollwitzer.com/js-assignment-operators.mp4"
  onPlay={() => {
    setPlayCount(playCount + 1);
    setPlayCount(playCount + 1);
    setPlayCount(playCount + 1);
    setPlayCount(playCount + 1);
    setPlayCount(playCount + 1);
  }}
/>
This example here is going to help us understand many important concepts of React state changes, but first, try to answer the following questions.
- What will
playCountbe after 1 click? - How many re-renders will happen?
Here's the flame graph:
To answer our questions:
- The new
playCountstate is1, NOT5 - There was only 1 re-render (despite 5
setPlayCountfunction calls)
One render => one snapshot
Let's start by learning why playCount is still equal to 1 despite multiple setPlayCount calls in the event handler. If you were attentively reading prior sections, you might have caught that each render in React produces exactly one JSX "snapshot", which is represented by the VDOM (virtual DOM) internally.
Remember, a component's props and internal state are the only two things that can trigger a re-render, and our components are pure functions. Given these two facts, we can call our components with the same parameters and get the same JSX snapshot every time. React uses this fact internally during reconciliation, but it can also be leveraged outside of React (e.g. testing libraries).
So let's figure out what our JSX snapshot looks like for App when starting out.
- Does
Apphave any props? - No. - Does
Apphave any state? - Yes, theplayCountvariable.
All we have to do is replace every occurrence of playCount with the current state to derive our initial snapshot. Since we initialize the value to 0 on the first page load, that's what we'll use. Here is our first render's "snapshot" (what React sees when it invokes our functional component for the render phase):
<main>
  {/* A custom video player */}
  <VideoPlayer
    src="https://media.zachgollwitzer.com/js-assignment-operators.mp4"
    onPlay={() => {
      // SNAPSHOT VALUE SUBSTITUTED IN EACH FN HERE!
      setPlayCount(0 + 1);
      setPlayCount(0 + 1);
      setPlayCount(0 + 1);
      setPlayCount(0 + 1);
      setPlayCount(0 + 1);
    }}
  />

  <div>
    <h2>Statistics</h2>
    <p>Play count: 0</p> {/* SNAPSHOT VALUE SUBSTITUTE HERE! */}
  </div>
</main>
The reason playCount is equal to 1 is because if you remember from earlier, we are reading the current render's snapshot, which is 0. Therefore, we're basically doing this:
let playCount = 0; // state initialized to 0

playCount = 0 + 1; // state set to 1
playCount = 0 + 1; // state overwritten with value of 1
playCount = 0 + 1; // state overwritten with value of 1
playCount = 0 + 1; // state overwritten with value of 1
playCount = 0 + 1; // state overwritten with value of 1

console.log(playCount); // 1
Batching state updates
Do you remember earlier when I explained how calling setPlayCount would trigger React to schedule a re-render? It does, but for performance reasons, this happens in a batch.
When you have multiple state updates in a single event handler, React will "batch" all of them into a single state update to avoid multiple re-renders.
To explain this, I'm going to elaborate on an excellent analogy given in the official React docs, which compares event handler state updates to making an order at a restaurant. Does this scenario sound familiar to you?
- Waiter: "What would you like to order?"
- You: "Can I have a soup and salad?"
- Waiter: writes "soup and salad" on order notebook
- You: "I'm so sorry... Can I change my order actually? Instead, can I have your grilled chicken salad?"
- Waiter: "Sure thing!" (crosses out previous order, updates it on notepad)
- Waiter: "Is that all?"
- You: "Yes, thanks!"
- Waiter: walks back to kitchen, submits your order
Does this look familiar now? What should the final state be?
onClick={() => {
  setOrder('soup and salad')
  setOrder('grilled chicken salad')
}}
While at the customer's table (event-handler fn), the waiter does not go back to the kitchen (React) every time the order changes. Instead, they jot down orders until everyone at the table (event-handler fn) is done ordering. When everyone is done, the waiter goes back to the kitchen (React) with everyone's FINAL orders and submits them.
This is how React state is batched. The entire event handler runs before the state update is made internally.
This explains why despite having 5 setPlayCount calls, React only schedules one re-render.
Updater functions
The key concepts of our example have been explained, but there's one important "gotcha" that changes how things work here.
In React, setState functions allow you to use an "updater" callback function that provides the previous state as an argument.
<VideoPlayer
  src="https://media.zachgollwitzer.com/js-assignment-operators.mp4"
  onPlay={() => {
    setPlayCount((prevState) => prevState + 1);
    setPlayCount((prevState) => prevState + 1);
  }}
/>
What does playCount equal after a button click now?
A bit surprisingly, it equals 2. In plain JavaScript, this is what's happening here:
let playCount = 0; // initial state

playCount = playCount + 1;
playCount = playCount + 1;

console.log(playCount); // 2
But... you said that state updates were batched?!?! From a re-rendering standpoint, yes. Even though our final state value is 2 here, React still only re-renders this once. Using our restaurant analogy again, when we use an updater function in React, it's kind of like this interaction:
- Waiter: "What would you like?"
- You: "Can I have a cup of soup?"
- Waiter: "Sure! Let me write that down."
- You: "Can I also have a salad?"
- Waiter: "Sure! I'll add that to my list"
In this interaction, the waiter is adding to, not replacing the prior state at the table (event handler fn), but is NOT going back to the kitchen (React) to submit the order until it is complete.
React state recap
There are many more topics that I did not cover about state as I didn't feel that they enhanced our discussion on the lifecycle of a React component. No matter how advanced you are, I highly recommend supplementing this post with a thorough read of managing React state in the official docs.
In the context of a component's lifecycle and this post, here are the key takeaways:
- A state update triggers React to schedule a re-render
- Each render corresponds to a single JSX "snapshot", which references the static state values at the time of the re-render
- Within event handlers, state updates are batched
- Across event handlers, state updates are NOT batched (e.g. if you click two different buttons that both change state, this triggers 2 re-renders)
- "Updater functions" give you access to the prior state value
Chapter 4: Storing values outside of React state
When you think of useRef, what comes to mind?
Chances are, your first thought had something to do with controlling native DOM elements with JavaScript:
function RefExample() {
  const ref = useRef<HTMLInputElement | null>(null);

  return (
    <>
      <input ref={ref} />
      <button onClick={() => ref.current?.focus()}>Focus input</button>
    </>
  );
}
In the example above, we're getting a reference to the underlying DOM input element and imperatively controlling it with JavaScript. We need this ref because React does not provide native DOM methods to us.
While this is the most common use case for useRef, it can distract us from the real motivation behind useRef.
The key concept to understand here with refs is they shouldn't be needed during the rendering phase. In other words, they are an "escape hatch" that allows you to store references to values outside of React, yet persist those values between renders. Here are some quick facts about refs that are useful to know:
- Changing
ref.currentis perfectly fine (it is just a JS object) - When
ref.currentchanges, NO re-render is triggered - Changes to
ref.currentare synchronous (unlike state values) - Using
ref.currentas a dependency to something doesn't do anything because of the points above - The
ref.currentvalue is alwaysnullduring the initial render - The
ref.currentvalue is set during the commit phase - There is only one reason to mutate
ref.currentduring the render phase, and that is for initialization of the ref.
Now that you have a baseline understanding of what they are and how they work, let's add a few refs to our existing app!
Imperatively controlling the VideoPlayer with refs
In the App from earlier, we had a VideoPlayer, but with just one problem... The "Play" button didn't actually control the video player.
We can fix this with a ref. Here's how we do that:
function VideoPlayer({ src, onPlay }: { src: string; onPlay(): void }) {
  // Our ref to the video DOM element
  const videoRef = useRef<HTMLVideoElement | null>(null);

  return (
    <>
      <video
        ref={videoRef} // sets the ref during commit phase
        src={src}
        controls
      />

      <div className="video-buttons">
        <Button
          onClick={() => {
            // Calling a native DOM API method
            videoRef.current?.play();

            // alerts parent component of a play
            onPlay();
          }}
        >
          Play
        </Button>
      </div>
    </>
  );
}
At this point, the button plays the video, but does not pause it. We'll handle that when we get to the next chapter!
Using forwardRef to control native DOM elements
There is another improvement we can make to our code, and that is through the forwardRef method in React. In general, when you create custom components that wrap native HTML elements, it's a good practice to forward the ref of that native element so that consumers of the component can attach a ref attribute.
Let's do that with our Button element:
const Button = forwardRef<
  HTMLButtonElement,
  ButtonHTMLAttributes<HTMLButtonElement>
>((props, ref) => {
  return (
    <button
      className="your custom button classes here"
      ref={ref} // this is the ref we're passing
      {...props} // spread the rest of the HTML button props
    ></button>
  );
});
The syntax is a bit weird looking, but all we're doing here is "passing along" the HTML button with some pre-defined styles.
We can now use the native onClick handler for this without defining it as a prop AND we can access the underlying button element ref from our custom Button component. In this example, we're not doing anything with the ref, but I included it for demonstration purposes.
function VideoPlayer({ src, onPlay }: { src: string; onPlay(): void }) {
  const videoRef = useRef<HTMLVideoElement | null>(null);

  // Not useful, only for demonstration
  const buttonRef = useRef<HTMLButtonElement | null>(null);

  return (
    <>
      <video ref={videoRef} src={src} controls />
      <div className="video-buttons">
        <Button
          ref={buttonRef} // This isn't very useful and is only for demonstration
          onClick={() => {
            videoRef.current?.play();

            onPlay(); // alerts parent component of a play
          }}
        >
          Play
        </Button>
      </div>
    </>
  );
}
These are arguably the two most common use cases for refs, but we'll come back to this later in the post to get our "Play" button a bit more interactive!
The difference between useRef and createRef
If you want a full explanation, read this.
If you want a concise one:
createRef- used in class components (legacy)useRef- used in functional components (recommended)
In a functional component, useRef retains its value across renders while createRef re-initializes on every render (i.e. basically just a variable).
Chapter 5: Dealing with external systems (useEffect)
So far, we have only dealt with things that happen during the render phase (for the purpose of calculating the new JSX to commit). But what happens after the commit?
Anything that you place inside a useEffect hook will run after changes are rendered and committed to the screen. If you come from the legacy world of React, useEffect is a combination of componentDidMount, componentDidUpdate, and componentWillUnmount lifecycle methods, all in one spot.
There are two behaviors packed into this hook that you must understand.
- When is
useEffectcalled? - What happens when the component is unmounted?
When is useEffect called?
There are two reasons that useEffect will be called.
- It is the component's first mount to the page (usually a browser refresh)
- One of its dependencies has updated
Let's look at three examples:
// Runs after every single commit (because no dependency array)
useEffect(() => {});

// Runs on the first commit (i.e. on component mount)
useEffect(() => {}, []);

// Runs on the first commit AND when `someVariable` changes
useEffect(() => {}, [someVariable]);
Remember, regardless of the reason for being called, useEffect always runs after the component has re-rendered and changes have been committed to the DOM.
What happens when the component unmounts?
While not explicitly required, useEffect can return a function. This is called the "cleanup function" and will run when the component unmounts from the DOM (either a page reload or some state changes that removes it from the page).
useEffect(() => {
  console.log("I run when the component mounts for the first time");

  return () => console.log("I run when the component unmounts");
}, []);
Why do we need useEffect?
Here's what we know:
useEffectruns after the re-render / commit phasesuseEffectcan, but doesn't have to run on every re-renderuseEffectcan call a "cleanup function" when the component unmounts
Since we can control when it runs and it runs after rendering, it's probably a good place to do things that are either slow operations or external to React.
Since this post is primarily concerned with lifecycles and the "bigger picture" of how a React component works, I will not be diving into the countless examples of when you should and should not use useEffect. The new React documentation has some excellent information on this:
- Synchronizing with Effects - elaborates on the discussion above
- You Might not need an Effect - outlines a bunch of the common anti-patterns while using
useEffect - Reference - gives concrete examples of various use-cases
Chapter 6: Thinking about React performance
I enjoy using React overall, but one of my biggest complaints about it is the number of implicit rules that you have to follow; many of which are not 100% intuitive. The prior section on useEffect demonstrated this well. Take a look at this:
type Comment = { name: string }; // simplified

const [postId, setPostId] = useState(1);
const [comments, setComments] = useState<Comment[]>([]);

const filteredComments = comments.filter(
  // Only grab comments with a name less than 100 characters (not useful, demonstration only)
  (comment) => comment.name.length < 100
);

useEffect(() => {
  fetch(`https://jsonplaceholder.typicode.com/comments?postId=${postId}`)
    .then((res) => res.json())
    .then((data) => setComments(data));
});
In just a few lines of code, we have completely destroyed our application. As you might have guessed from bad experiences of your own, the code above causes an infinite loop where a GET request runs on every re-render.
And the worst part? The code doesn't appear to be all that problematic!
That's because React has all sorts of implicit behavior that we must know about to use it effectively. Here are some of those implicit behaviors packed into the code above:
- The code inside
useEffectwill run on EVERY re-render because we did not provide a dependency array - Since
setCommentsis insideuseEffect, every timeuseEffectis called, React will set state and schedule a new render - The
filteredCommentsvariable will be re-evaluated on every single render (if there are tons of comments, this is not good)
Let's do a SUPER SMALL refactor:
type Comment = { name: string }; // simplified

const [postId, setPostId] = useState(1);
const [comments, setComments] = useState<Comment[]>([]);

const filteredComments = useMemo(
  () =>
    comments.filter(
      // Only grab comments with a name less than 100 characters (not useful, demonstration only)
      (comment) => comment.name.length < 100
    ),
  [comments]
);

useEffect(() => {
  fetch(`https://jsonplaceholder.typicode.com/comments?postId=${postId}`)
    .then((res) => res.json())
    .then((data) => setComments(data));
}, [postId]);
I made two changes here:
- I added
[postId]as a dependency array touseEffectso the query only runs when thepostIdstate changes - I added a
useMemohook around ourfilteredCommentsvariable so that it only runs when thecommentsstate changes
With barely any changes, we took this code from an infinite loop that crashes everything (including your happiness) to performant React code.
To check your understanding, how many re-renders happened here?
Assuming nothing else is in your app, here's what this code does:
- On first page load, React calls
createRootand uses the initial state. ThepostIdstate variable will be equal to1, thecommentsstate variable will be equal to[], and thefilteredComments(derived state) variable will be equal to[]. - After the first page load renders and commits,
useEffectis run, which will make an asynchronousGETrequest. When the request completes, the data returned will be set as the new comments viasetComments(data). This will trigger a re-render. - On the second render,
postIdis still1, butcommentsis now populated with an array of data (assuming the request returned successfully). ThefilteredCommentsvalue will evaluate again (because its dependencycommentschanged) and will contain some data (assuming there are comments with names less than 100 characters). Finally,useEffectwill NOT run again becausepostIdhas not changed.
In total, there will be 2 renders.
But how many will you see in the console during local development?
You will see 4 re-renders in the console because we're in StrictMode which re-renders 2x to check the purity of your component!
While this example was rather simple, it shows us how our new understanding of React can help us write more performant code.
Use the Profiler often
Getting comfortable with the React dev-tools Profiler is one of the most beneficial things you can do for the performance of your applications. The idea is to look for huge performance issues in your app, not the small ones that have little impact. The Profiler is a great tool for diagnosing these huge performance issues since it's highly visual.
Let's take the code from the prior section and make an app out of it. You might have wondered at some point in your React career, "Do I need that useMemo hook here?".
We're going to use the Profiler to answer this question.
First, (IMPORTANT) we are going to turn OFF StrictMode. Our entrypoint will look like this now:
import { createRoot } from "react-dom/client";
import App from "./App";

const rootElement = document.getElementById("root");
const root = createRoot(rootElement!);

root.render(<App />);
Normally you wouldn't do this, but this will help us evaluate things a bit easier by eliminating extra re-renders that only occur in development environments.
Second, let's create our app:
import { useState, useEffect } from "react";
import "./App.css";

type Comment = { id: number; name: string; body: string };

function Comment({ comment }: { comment: Comment }) {
  return (
    <div>
      <p>Comment {comment.id}</p>
      <p>Name: {comment.name}</p>
      <p>Body: {comment.body}</p>
    </div>
  );
}

export default function App() {
  const [postId, setPostId] = useState(1);
  const [comments, setComments] = useState<Comment[]>([]);
  const [forcedRerenderCount, setForcedRerenderCount] = useState(0);

  // Only show comments who has a title less than 6 words
  const filteredComments = comments.filter(
    (comment) => comment.name.split(" ").length < 6
  );

  useEffect(() => {
    fetch(`https://jsonplaceholder.typicode.com/comments?postId=${postId}`)
      .then((res) => res.json())
      .then((data) => setComments(data));
  }, [postId]);

  return (
    <main>
      <button onClick={() => setForcedRerenderCount((prev) => prev + 1)}>
        Force a re-render ({forcedRerenderCount})
      </button>

      {filteredComments.map((comment) => (
        <Comment key={comment.id} comment={comment} />
      ))}
    </main>
  );
}
Next, we're going to open this app in the browser and do the following:
- Reset the Profiler and start running it
- Click the "Force a re-render" button one time
This should produce 3 re-renders.
- Initial render
- Initial render
useEffectwill run aGETrequest which triggers a re-render (viasetComments) - Clicking the button causes a re-render
With just this one example, we have a lot to talk about. I'm now going to walk through the "Ranked Chart" (an alternative to the Flame chart) for each render/commit cycle.
Render 1
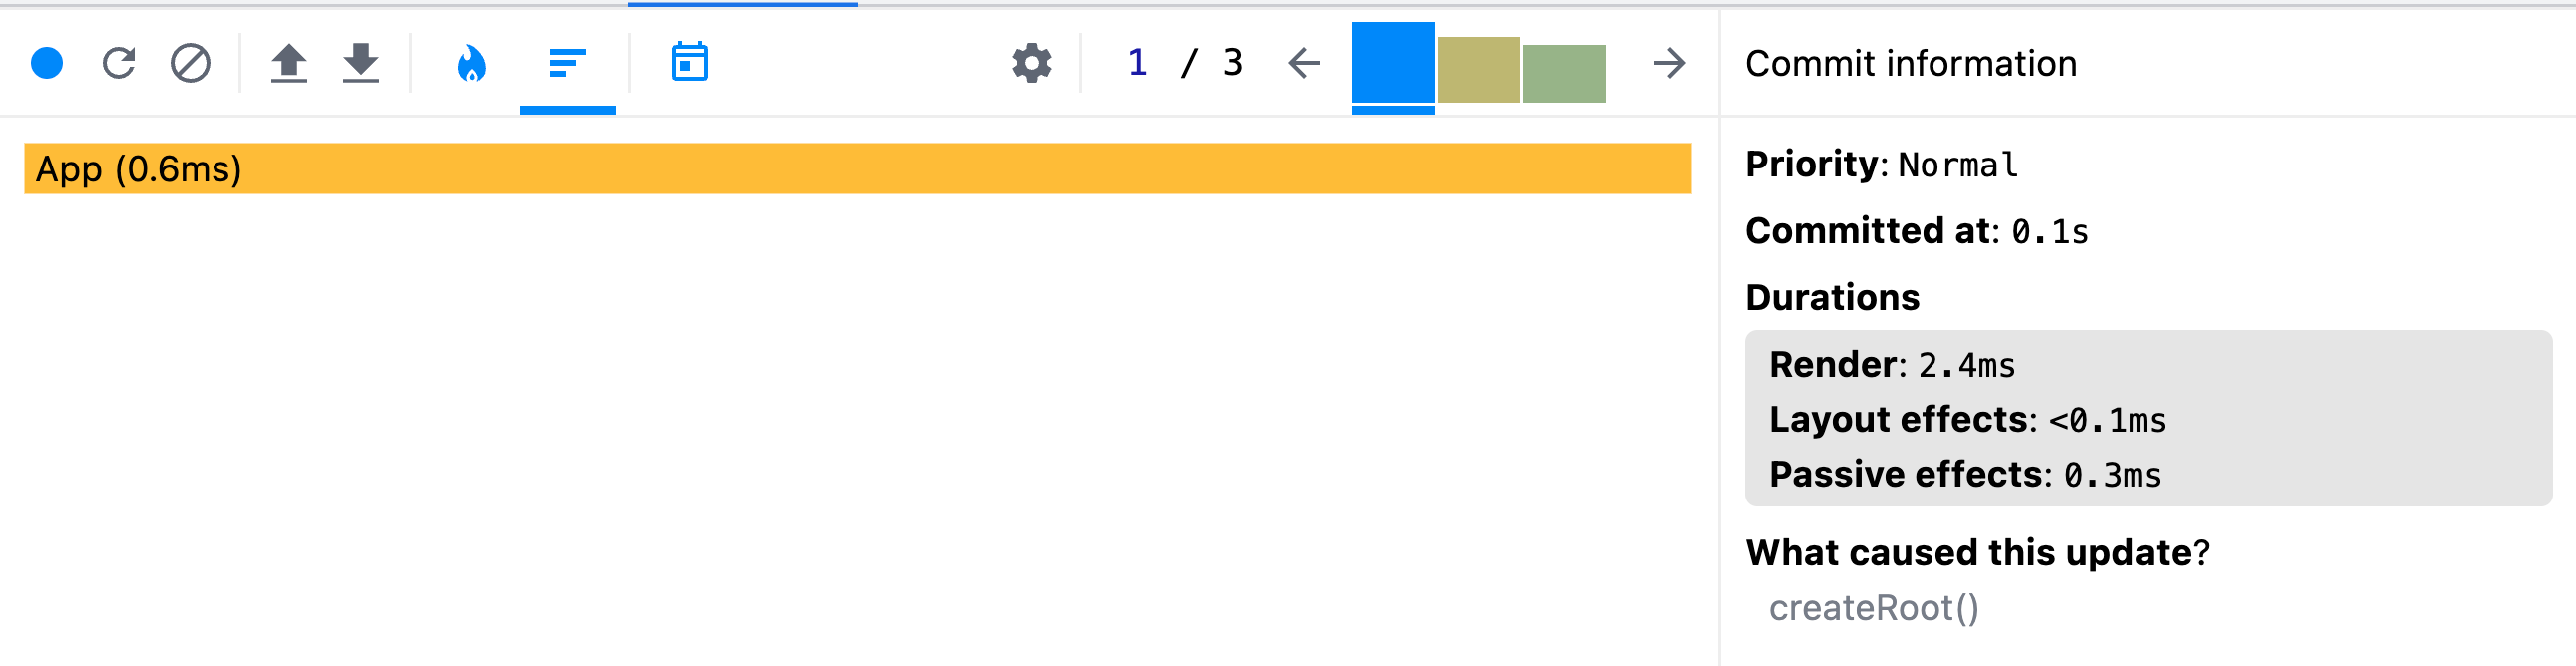
The first render represents the initial page load, which will always call any useEffect hooks. Only the App component renders and there are zero Comment components because the filteredComments evaluates to an empty array.
In "Durations", you can see measurements of our first useEffect invocation via "Layout effects" and "Passive effects"
A layout effect is an effect that runs before content is painted to the screen and is NOT typically associated with useEffect. You can read more about layout effects here. While researching for this post, I was unable to find a good explanation as to why layout effects are showing up in the Profiler despite not actually implementing them. My guess is that useEffect is trying to auto-optimize something here. Nevertheless, it represents a small portion of the total duration, so I wouldn't worry about it here!
A passive effect is what we would associate with useEffect because it is passively happening after everything has rendered and committed.
In this first render, you can see that our GET request in useEffect took about 0.3ms to complete.
Render 2
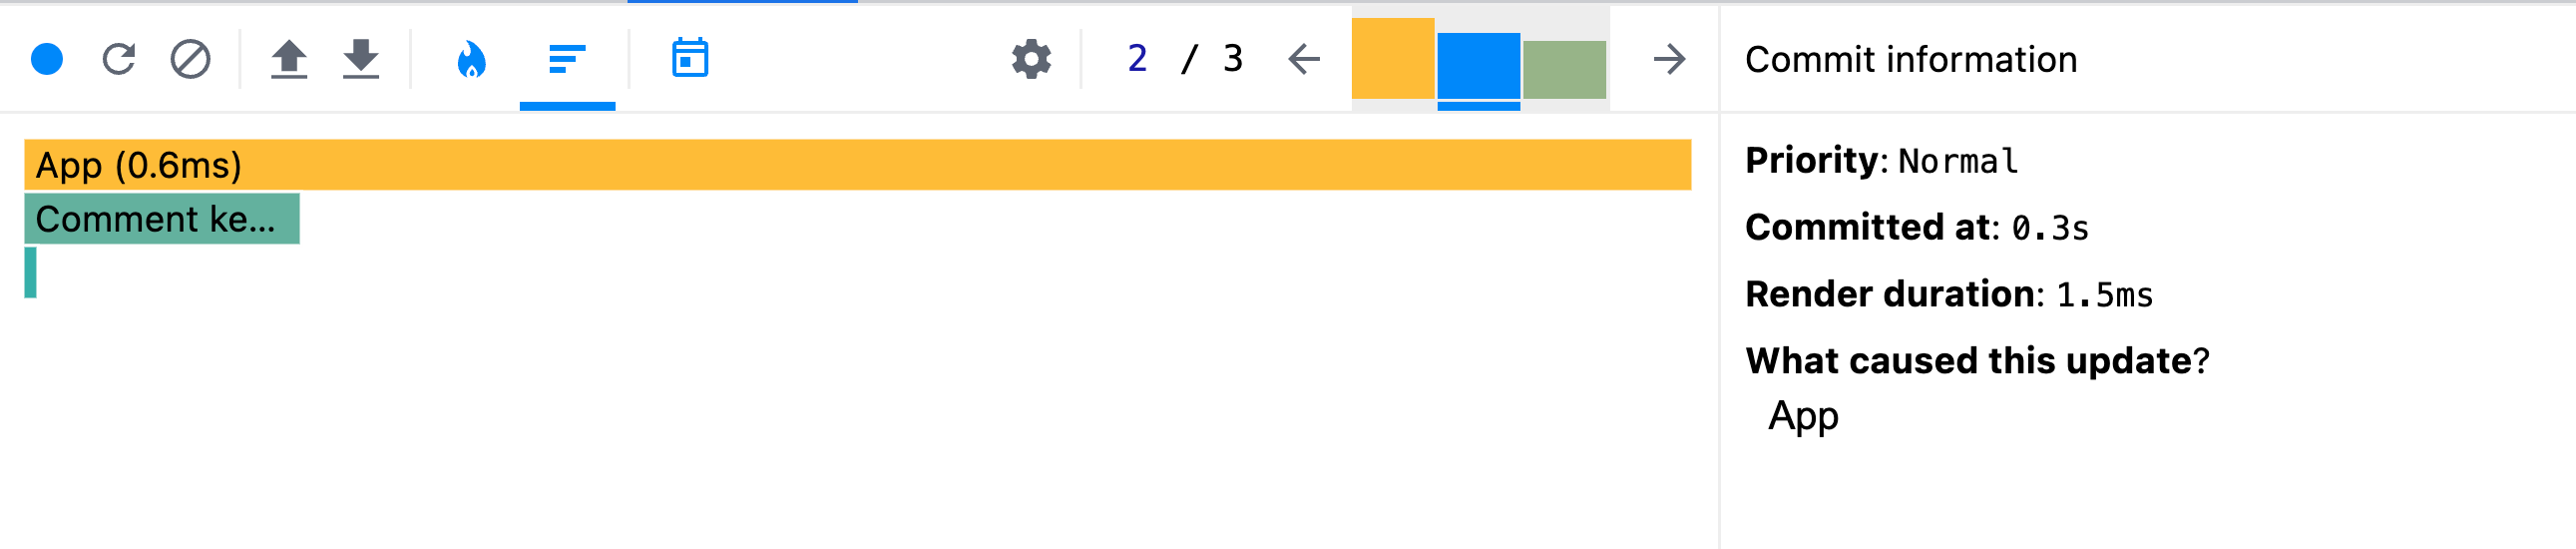
The second render is caused by setComments that is called inside useEffect (which ran on the first render as it always does).
Notice in the "Durations" section there are no layout/passive effect durations. This is because during the second render, postId has not changed and our useEffect does NOT run
Also notice that we now have 2 Comment components showing up in the flame graph, which represent our filteredComments derived state.
Render 3
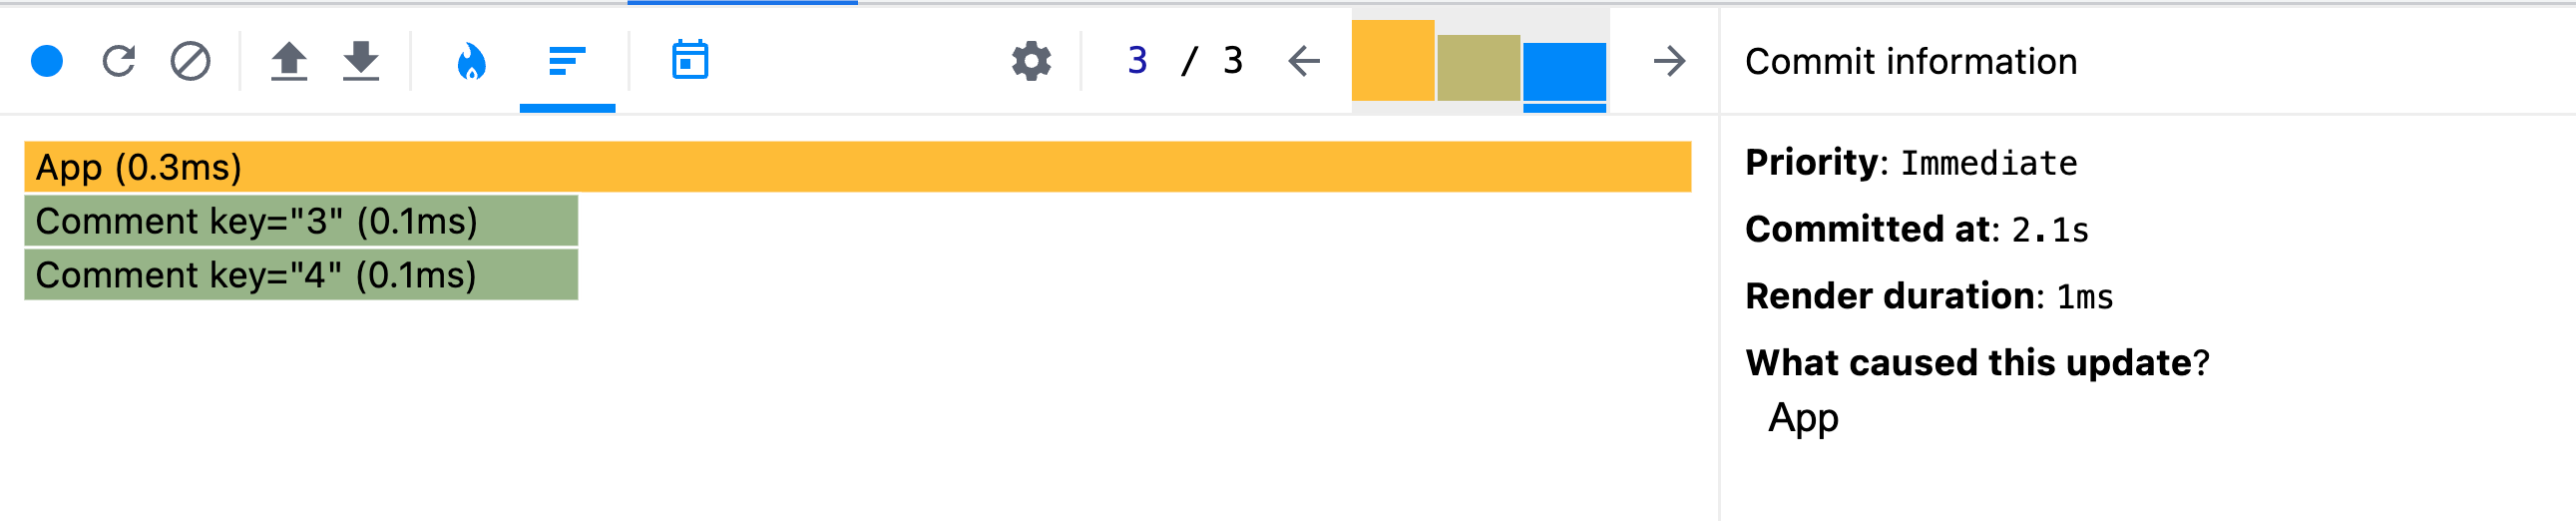
The third render was me manually clicking the "Force re-render" button (you wouldn't be able to determine that without me telling you).
There are several noteworthy things happening here:
- The
useEffectwas NOT called in the third render becausepostIddid not update. - On the contrary,
filteredCommentsDID re-evaluate because it's a normal variable in the component function, which is called as a pure function during each render. - Both of our
Commentcomponents were rendered, but much quicker than before because their keys and values did not change, which means they did not unmount from the DOM between renders.
Does useMemo help?
To evaluate whether useMemo is worth using here, we need to understand how to test it. In the first two renders, everything will be the exact same. It is the third render where useMemo can be compared because adding it will cause new behavior. In the first version of our code, filteredComments will re-evaluate on EVERY render. In the second version, filteredComments only re-renders if comments changes. Since clicking our "Force re-render" button does NOT change the value of comments, we would expect that filteredComments would return a memoized value rather than re-evaluating.
Here's the third re-render (using useMemo):

Let's compare the two:
- 3rd re-render without
useMemoduration -1ms - 3rd re-render with
useMemoduration -0.7ms
So...
We can see that useMemo did reduce our render time, but only by 0.3ms. And this leads us into our final discussion:
When should I use useMemo and useCallback?
React devs overuse these optimization hooks because "why not get extra performance?"
Yet with any feature, there is a cost.
The cost of useMemo and useCallback
When you decide to implement these hooks in your code, your "cost" is twofold:
- More clutter in our components
- More code = more memory allocation
Unless the operation you're memoizing is truly expensive, it can often be more costly from a performance standpoint to include these hooks not only from a code organization standpoint, but also because they add more code to your render process. These hooks have logic of their own going on behind the scenes that result in more memory allocation and a bigger program.
Considerations to make
I think most guides get this section wrong. The typical answer is "if it's expensive, use optimizations".
Okay... so what does "expensive" mean?
In my opinion, the easiest way to answer this question is to use the Profiler in your dev tools and a bit of common sense. It's hard to remember what types of operations "cost" you more. It's easy to visualize it in a Profiler flame chart.
So let's use our example from earlier and answer this question.
Given the difference of just 0.3ms, we can conclude that useMemo is NOT worth it and should be removed from our code. That said, there are additional considerations you can make:
- What is the maximum number of items that you expect in the
commentsarray? - How often does your component re-render due to things other than
commentschanging? (e.g. the "Force re-render" button)
Let's say that depending on the post, your comments array could be anywhere from 5 comments to 1,000 comments. Filtering an array of 1,000 items will incur a cost much more significant than 5. In this case, you might consider useMemo as a safeguard.
But in many cases, you'll know how many comments will show up in that array. Maybe your database puts a LIMIT 100 clause on the query to fetch comments. In this case, we know that the maximum length of the comments array is 100 items and can safely remove useMemo knowing that it won't make a huge difference.
Checklist for deciding when to use optimization hooks
Here's a personal checklist that I use to decide whether an optimization is needed.
- By default, don't use optimizations ("just in case" and "I don't understand, so might as well" are BAD reasons to use them)
- If the Profiler reveals something that takes a disproportionate amount of time during rendering, consider using an optimization
- If the bounds of the calculation vary widely, consider using an optimization. For example, if you're filtering an array of comments that could have a length anywhere between 5 comments and 5,000 comments, an optimization might be worth it (although I'd question why you've found yourself in this situation as you shouldn't be loading 5,000 of anything client-side in one query)
- If you know that your calculation is expensive (and can explain it). Some common examples include:
- Certain regular expressions
- Custom algorithms that involve lots of loops
- Things that you have manually benchmarked
Closing thoughts
If you haven't already, go read the new React documentation. It elaborates on everything contained in this post with all sorts of examples. It was completely re-done and the author is one of the core React contributors.
If anything, I hope you take the following things away from this post:
- React works in 3 phases: Trigger, Render, Commit
useEffectruns AFTER render/commit phases- You probably don't need
useMemoanduseCallback - The dev tools Profiler is your friend. Invest the time to learn it.